Tuesday, December 02, 2014

HP EliteDesk 800 G1 Mini PC in the Classroom Contest

The Hewlett Packard EliteDesk 800 G1 Mini PC is a tiny desktop computer with lots of big features!

Its footprint is 6.9 x 1.3 x 7.0 inches and it weighs only 2.92 pounds, less than a lot of laptops! The HP EliteDesk 800 G1 Mini PC  has a 4th generation Intel processor and runs the newest Windows operating systems. The front of the computer includes two USB 3.0 ports (one of which is a USB fast charge port) and an audio-out and microphone jack.


Shown with optional stand, monitor, keyboard and mouse


On the back, it has an additional four USB 3.0 ports, a VGA connection, an Ethernet port, 2 Display Ports, and an audio-out jack. The bottom of the HP EliteDesk 800 G1 Mini PC has a VESA mount.

A wireless card is an option as is an external DVD/RW drive. With a 500GB standard hard drive or up to a 1TB solid state drive, the HP EliteDesk 800 G1 Mini PC packs a great computer into a "mini" package. Also, due to its small size, it has more than 3 times the energy-efficiency of a tower desktop.


The unit I received has a 2.9gHz i5 processor and is running Windows 7 Professional, but the upgrade disk to Windows 8.1 was also included in the package. It has 4GB RAM, a 128GB solid state hard drive, and the WiFi card.


Here is more detailed specs and information about the HP EliteDesk 800 G1 Mini PC.


USE IN SCHOOLS

In the education arena, the HP EliteDesk 800 G1 Mini PC can solve any number of problems as well as help schools think “out of the box”.

Teacher’s desks are notoriously cluttered with the tools of the trade…their teaching materials, stationery supplies for student use, and much more. The diminutive footprint of the HP EliteDesk 800 G1 Mini PC can free up a ton of usable space on a teacher’s desk and also eliminate the “big box” on the dusty floor! Teachers can easily get access to the USB ports and audio jacks on the front of the EliteDesk G1 Mini PC when they need to, too.

Another plus for teachers is the WiFi capabilities of the device. In the past, teachers were tied to classroom area of the Ethernet jack and VGA connection. Now, with wireless projectors and wireless network access, the HP EliteDesk 800 G1 Mini can sit anywhere in the room. In addition, with the plethora of collaborative apps that can have students share over WiFi, the teacher and students can share documents, collaborate in real-time on virtual whiteboards, and students can mirror their mobile devices to the teacher’s desktop.

In schools where security of computers in a lab setting or classroom is a concern, this tiny HP EliteDesk Mini 800 G1 Mini PC can be easily locked up at night in a drawer or closet. It does have the traditional cable lock port, but locking them up at night might be a better option.

The low cost and energy-efficiency also make this mini computer a perfect replacement for the bigger CPUs in a computer lab setting. The SSD drive makes them fast to boot up and, again, space is saved on the computer lab tables for other student project-based or reference work.

One creative idea, if students have a monitor, keyboard, and mouse at home, is to have the HP EliteDesk 800 G1 Mini PC become a school’s 1:1 device of choice. The light 2.92 lb. weight, the SSD drive which would not be subject to problems when carried in a backpack, and the built-in WiFi could allow students to bring it back and forth from school to home. In school, there would be labs of monitors, keyboards, and mice and extra sets of these in the classroom, library, science labs, and even the cafeteria!  A student would just hook-up his or her HP EliteDesk 800 G1 Mini wherever there was a “workstation” spot. 

THE CONTEST

HP graciously provided me with the opportunity to give away a new HP EliteDesk 800 G1 Mini PC to a lucky US or Canadian PreK-16 educator or pre-service or graduate education student! In order to have a chance to win the Mini PC, educators were asked to make a mini-- a mini-infographic that is!


As you know, an infographic is a visual representation of data. Having students create them as a formative or summative assessment can help them practice their information literacy, visual literacy, data literacy, and technology literacy skills.


When starting off with this type of lesson or unit, it is best to start small. Have students research to find one piece of interesting data, decide who the audience for the infographic is going to be, consider the type of data visualization that would work best to showcase the information, and then create a mini-infographic showcasing just that single piece of interesting data.


USA Today, since beginning publication, has offered a mini-infographic they call a “snapshot” on the front page of each issue of the newspaper. Researchers, reporters, and editors in each of the primary departments of News, Money, Sports, and Life account for most of the ideas and research for these snapshots. Once the research is complete, the information goes to a graphic artist who creates the infographic. This process usually take between three and four hours.


Here are some links to sample USA Today snapshots in the area of news.


CONTEST OVERVIEW (CONTEST CLOSED DECEMBER 7, 2014)


In order to participate in the contest to win an HP EliteDesk 800 G1 Mini PC desktop computer, the educator had to create a mini-infographic or “snapshot” and submit it to me. The winner of the HP EliteDesk 800 G1 Mini PC was randomly chosen from those educators who submit the mini-infographic.


The topic of the infographic had to be in their content area, an education or educational technology-related topic, or anything else of interest to K-12 educators or students. The infographic could have been intended to inform or persuade.  I provided the entrants with the background image to use for the infographic.


To find out more about infographics, visit my infographics page here: http://www.schrockguide.net/infographics-as-an-assessment.html


CREATING THE MINI-INFOGRAPHIC


The easiest way to create a mini-infographic is to create a single slide in PowerPoint, Keynote, or Google Slides.  For this contest, I had created a PowerPoint, Keynote, and JPEG version of the background entrants were required to use. The background illustrated the "clean" desk teachers would have by using an HP EliteDesk 800 G1 Mini PC!


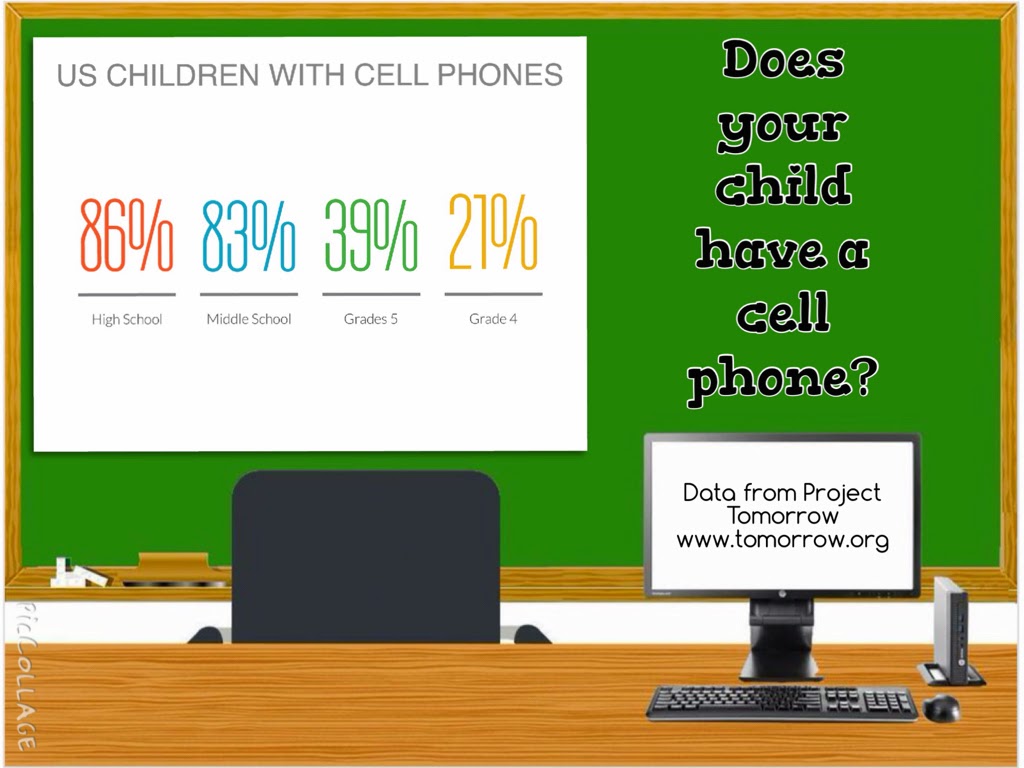
On that single slide/image, entrants had to add the text and data information, and include the citation to the sources used for their infographic information. All of that information had to be that single slide. Here is a sample I created:


When entrants were finished with the slide, in PowerPoint they picked FILE- SAVE AS PICTURES, in Keynote picked FILE-EXPORT TO- IMAGES, and in Google Slides picked FILE- DOWNLOAD AS- JPEG IMAGE. They saved the image to their desktop or Google Drive (or their Camera Roll or Gallery if they were using a tablet).

Entrants emailed the single JPEG image to me at kathy@kathyschrock.net. They also put "Mini" in the subject line of the email and their name, email address, and Twitter handle (if they had one) in the body of the email.


Here were the links to the background image in the three different formats


REVIEW


Educators had to locate some small bit of data they wanted to share with other educators or students. Using the background on the single slide, they added --

  • a title for the infographic
  • a labeled chart or graph
  • text to explain what the viewer is seeing
  • URL to the page(s) where they obtained the data
  • Saved the slide as JPEG to their computing device
  • Sent the JPEG as an attachment to kathy@kathyschrock.net with the subject of "Mini"
  • Included their name, email address, and Twitter handle, if they had one, in the body of the email
The contest was open to PreK-16 educators and pre-service and graduate education students in the United States and Canada.

By submitting the mini-infographic entry, entrants had a random chance to win the HP EliteDesk 800 G1 Mini PC and they were giving me permission to possibly post your infographic on my blog site whether they won or not. Their name would not appear on the Web page, just the mini-infographic itself.


By submitting the entry, if they were chosen as the winner, they were are also allowing me to share their name, email address, and mailing address with HP (or an HP associate) so they could send the winner  the HP EliteDesk 800 G1 Mini PC.


The winner’s name would be announced on the blog (but not tied to their submission) and on Twitter.


The email address of all who submit entries will remain private except for the winner, whose email address will be shared with HP (or an HP associate).

The submissions were due on: December 7, 2014 by 11:59 PM Eastern Time and the contest is now closed.

UPDATE DECEMBER 8, 2014


SUBMITTED INFOGRAPHICS


Here are some of the great mini-infographics that were submitted! Thank you to all who re-tweeted about the contest and for those that submitted an entry!


THE WINNER

The randomly-chosen winner of the giveway of the HP EliteDesk 800 G1 Mini PC was Mark Case! I used the DecideNow app on the iPad to pick the winner-- congrats to Mark!

Monday, December 01, 2014

Literacies for the digital age: Historical literacy


This is the fourth in a series of blog posts highlighting the digital literacies our students will need to succeed. This post will provide you with some ideas on how to infuse historical literacy into the curriculum.

WHAT IS HISTORICAL LITERACY?

The Hyperhistory site from the National Centre for History Education in Australia is a wonderful site for learning about all aspects of history education, including historical literacy. They have a teacher’s guide which contains information about the nature of historical learning, historical literacy, history education and ICT, and more. Their overview of the key elements of historical literacy include:
  • Events of the past: knowing and understanding historical events
  • Narratives of the past: having time to think about how the past can be explained through a variety of perspectives
  • Research skills; gathering, analyzing, and using artifacts, documents, and graphics
  • The language of history: interpreting words in history
  • Historical concepts: understanding the cause and motivation of historical events and to understand events from the point of view of participants
  • ICT understandings: how to identify bias, authority, and reliability in online information
  • Making connections: thinking about the present and the past
  • Contention and contestability: understanding about debate and discourse in a historical perspective
  • Representative expression: understanding history through art and media of the past (and visual media literacies are important here)
  • Moral judgements in history: dealing with the moral and ethical components of historical events
  • Applied science in history: facial reconstruction, computer imaging, DNA testing, forensic science, satellite mapping, etc.
  • Historical explanation: the ability to reason historically based on a foundation of evidence

HISTORICAL LITERACY AND THE CURRICULUM

The acquisition of historical literacy skills in the digital age involves aspects of other literacies, too. Students need to use the information literacy skills for the research process which involves::
  • Identifying a list of keywords about the topic
  • Creating an essential question
  • Listing the places for gathering their information. This may include the the Web, subscription databases, or experts in the field.
  • Conducting some cursory research to make sure there will be information available for their topic.
  • If necessary, re-working their original question.
  • Utilizing critical evaluation skills in order to determine the credibility, validity, and authority of the research they find.
  • Gathering their assets and remembering to cite their sources

Understanding history through the art and media of the past includes an attention to the media literacy skills, outlined by the Media Literacy Project, which include having students:
  • Understand how media messages create meaning
  • Identify who created a particular media message
  • Recognize what the media maker wants us to believe or do
  • Name the “tools of persuasion” used
  • Recognize bias, spin, misinformation and lies
  • Discover the part of the story that’s not being told
  • Evaluate media messages based on their own experiences, beliefs and values
  • Create and distribute their own media messages
  • Become advocates for change in their media system
Viewing the art and media of the past also involves the visual literacy skills included in the definition  created by the Association of College and Research libraries as those that “equip a learner to understand and analyze the contextual, cultural, ethical, aesthetic, intellectual, and technical components involved in the production and use of visual materials.”

RESOURCES

One of the ways many of the key skills of historical literacy can be acquired is through the use of primary source documents. Since so many historical artifacts are now digitized and available online, items can be found to support many content areas and time periods. Historical literacy, to me, seems to be a component of all of the subject areas and not just a part of the social studies curriculum. There are many well-know collections of primary source documents, some of which provide materials to support teaching and learning. Here are two of my favorites!

American Memory Collection

The American Memory Collection is a project of the Library of Congress. It includes access to over 9 million items including written and spoken words, sound recordings, still and moving images, prints, maps, and sheet music that document the American experience. The digitized items are from the collections of the Library of Congress as well as other cultural institutions.
Their site includes a wonderful section about primary sources which provides teachers with guides and handouts to help this process. The parts of this section include:
  • Using primary sources: an overview of how to guide students through the process
  • Why use primary sources: how to give students a real sense of what it was to be alive in an earlier time
  • Citing primary sources: style guidelines for MLA and Chicago
  • Copyright and primary sources: generation information about copyright as well as specifics regarding the collections on their site
  • Finding primary sources: links to the gathered resources such as sets of primary source materials, sources by US state, themed resources, Web guides, and more
  • Teacher’s guides and analysis tools: guides for teachers to help them teach the analyzing of primary sources, printed texts, maps, motion pictures, oral histories, photographs and prints , political cartoons, sheet music and song sheets, and sound recordings
This is the Primary Source Analysis tool for students to use.

National Archives 

The National Archives and Records Administration also includes a teaching and learning section for using the documents of the United States government in teaching and learning.
The site includes links to:
  • Featured exhibits which are collections of documents about a theme, such as the “Charters of Freedom” and the “Discovering the Civil War”
  • The Digital Vaults which include 1200 of the over 10 billion records housed there; one of my favorites is a sample letter written by a teenager beseeching the government to allow the Beatles to perform even though, in 1963, there were labor restrictions in place that made it difficult for foreign musical groups to come to the US; students can also use the items in the vaults to make a poster of movie from resources they find.
  • eBooks that support exhibits such as signatures in the collection, baseball, emancipation, and the Constitution
  • Special topics on their DocsTeach page which include YouTube content, iTunesU courses, and podcasts, images, audio, and video “pinned” to Google Maps
  • DocsTeach allows educators to create their own interactive learning activities using documents from the collection and students can complete the activity via  an iPad app  or via a Web browser on a computer,
The National Archives site for educators also includes document analysis worksheets for the following types of documents.

What are your favorite historical online items to use with students? Let us know in Twitter! #kathyschrock

Saturday, November 01, 2014

Literacies for the digital age: Media literacy


This is the third in a series of blog posts highlighting the digital literacies our students will need to succeed. This post will provide you with some ideas on how to infuse media literacy into the curriculum.

WHAT IS MEDIA LITERACY?

There are many areas of media literacy.  Media Literacy Project has a wonderful document that presents the components of media literacy in a straightforward fashion and includes useful lists of the various concepts of this literacy. Their definition of media literacy is “the ability to access, analyze, evaluate and create media messages of all kinds.” They go on to state that media literacy skills can help students–
  • Understand how media messages create meaning
  • Identify who created a particular media message
  • Recognize what the media maker wants us to believe or do
  • Name the “tools of persuasion” used
  • Recognize bias, spin, misinformation and lies
  • Discover the part of the story that’s not being told
  • Evaluate media messages based on our own experiences, beliefs and values
  • Create and distribute our own media messages
  • Become advocates for change in our media system
The modern study of media literacy is not new.  I studied his media theories in communication classes during college in the mid-1970’s. But the aspects of accessing, analyzing, evaluating, and creating media goes back in history even more!  The Museum of Hoaxes site includes timelines of historical media hoaxes from as early as 1874 and photography hoaxes from 1861 and everything in-between! The ability to make a viewer or reader believe a fabricated story still exists today. And, as technology evolves. there are many more ways to fool the viewer with mash-ups, video and audio editing, and fabrication of images.

MEDIA LITERACY AND THE CURRICULUM

How does media literacy fit into the curriculum? One way, suggested by Frank Baker of the Media Literacy Clearinghouse, is including the critical viewing of videos in teaching and learning. Since there are various Common Core standards around this concept, this might be a good place to start since students are avid consumers and creator of video.
Steve Trowbridge, of the University of Houston-Victoria, has created a viewer document that includes ideas for students as they view photographs, videos, plays, and other forms of expression. Making students aware of the “message” of the media being presented or shown can help them develop the critical skills necessary to recognize bias and untruths as well as question their own beliefs. Trowbridge suggests a simple list of questions for students to think about during and after viewing media content. Of course, when creating their own media, students should apply this same set of questions to understand how others might view their message.
  • What is the message?
  • Who is the message for?
  • What is the purpose of the message?
  • What have I learned about the topic, about myself, and about others?
  • Whose point of view is presented?
And he suggests students need to ask themselves more pointed questions as to why and how the media was created, such as —
  • What individuals are most often represented in the media and what individuals (e.g., gender, culture, age) are absent?
  • From whose perspective is the story or image shown?
  • Who owns or supports this medium (e.g., television, newspaper, Internet) and what impact does such ownership have on visual content?
  • For whom is this message intended? Who wants to reach this audience and why?
  • What visual elements are used to get my attention?
  • How do my values and life experiences coincide with the visual messages to produce meaning for me?
Trowbridge provides activities educators can use to strengthen students’ viewing abilities including gallery walks, viewing centers, drama and puppetry plays, and more,
Andrea Quijada, the director of Media Literacy Project, presents a compelling case for the inclusion of media literacy skills training in the curriculum to help students become critical thinkers. Her TEDx talk follows–

THE NEW MEDIA LITERACY

With the new mediums comes a suggested list of the new media literacies. Project New Media Literacies focuses on the participatory culture we now live in, and identifies the skills for the online environment. These include:
  • Play
  • Performance
  • Simulation
  • Appropriation
  • Multitasking
  • Distributed cognition
  • Collective intelligence
  • Judgment
  • Transmedia navigation
  • Networking
  • Negotiation
  • Visualization
You can find out more about these on their site and download the teachers strategy guide to learn more.

RESOURCES

There are tons of sites focused on media literacy in K-12 available. Some of the most-often referenced (in addition to the ones mentioned already) include:
What media literacy resources do you use? Share with us on Twitter! #kathyschrock


Wednesday, October 01, 2014

Literacies for the digital age: Visual literacy

I have identified thirteen literacies important for students to master, which you can see below. This is the second in a series of literacies I feel are important for students to master.

The topic for this month is visual literacy.

Visual literacy, as defined by the Association of College and Research Libraries, “is a set of abilities that enables an individual to effectively find, interpret, evaluate, use, and create images and visual media. Visual literacy skills equip a learner to understand and analyze the contextual, cultural, ethical, aesthetic, intellectual, and technical components involved in the production and use of visual materials. A visually literate individual is both a critical consumer of visual media and a competent contributor to a body of shared knowledge and culture.”
I am going to break down this definition into its separate components in order to add information and sources that can help you embed aspects of visual literacy into the curriculum. Visual literacy can be applied to photographs, posters, advertisements, presentations, and infographics, to name a few. I am just going to speak to photographs in this post.

FINDING IMAGES

Sources of images for students to use can be found in many places. Discovery Education Streaming has over 33,000 images to pick from in many categories and at all grade levels. Many of these images are also tied to curriculum standards. These images can be downloaded and edited to be used in projects if you have a subscription to Discovery Education Streaming.
  • The Digital Public Library of America includes almost 8 million items from libraries, archives, government depositories, and museums. Many of the images in the collections can be shared, but not downloaded.
  • The Library of Congress has over 1 million photos, prints, and drawings in its database. Each of the collections may have a different license for use of the items in the collection, so remind students to read the “fine print”. For teachers, they have pulled together primary source sets on specific curriculum topics such as the Civil War, the Constitution, the Dust Bowl, and even have a link for primary sources by state.
  • Google Images, Bing, and Flickr are, of course, where students first go to look for images. With the advent of the Creative Commons licensing project, in which creators can assign explicit permission for using their images, each of these image search tools includes a way for students to search the images they are already allowed to use. (Of course, they can always ask for permission from the image creator to use an image that is not Creative Commons-licensed or to use it in another way.)

With Creative Commons licensing, these are four conditions a content creator can apply to their work: attribution, non-commercial, no derivative works, and share alike.
The attribution option means that the creator lets others copy, distribute, display, and perform their copyrighted work — and derivative works based upon it — but only if they give credit the way the creator requires.
The noncommercial option allows the creator to specify that others can use their work, but cannot make money off of it. If they want to use it commercially, they have to ask express permission and may have to pay the creator, too.
If the creator applies the no derivative works option to their work, they are allowing others to copy, distribute, display, and perform only verbatim copies of their work, not derivative works based upon it. If they allow derivative works, users can edit, change, and republish their image, with attribution.
The share alike option is one that I call “pay it forward”. This option follows the option of letting the user make derivative works.  This option allows the user to transform the content and create a derivative work, but requires them to apply the same Creative Commons license to their work as the one they originally consulted to create their work.
As far as students finding images that have Creative Commons licenses, this has become easy in these three image search engines.
In Google Images, after you conduct a search, click on SEARCH TOOLS, and you get a drop-down for Creative Commons-licensed images. Once you pick the appropriate one, the collection of images in your search will change
In Flickr, once you conduct a search, you see the CREATIVE COMMONS link right on the toolbar to limit your search to just Creative Commons-licensed images.
In Bing, after you limit your search to images, you see the license option on the toolbar. Public domain images are those that are free to use, but the rest of the choices refer to Creative Commons-licensed images.

INTERPRETING IMAGES

Becoming visual literate involves practicing with interpreting images. This is more commonly called “photograph analysis”. Both the Library of Congress and the National Archives have wonderful teacher and student tools for doing this in addition, of course, to many, many images that can be used in support of the content you are teaching.
Library of Congress
The Library of Congress Teacher’s page dealing with primary sources includes information about engaging students with primary sources, promoting student inquiry, and having students apply critical thinking and analysis skills. Here is the list of questions from their page.
1. Engage students with primary sources.
Draw on students’ prior knowledge of the topic.
Ask students to closely observe each primary source.
  • Who created this primary source?
  • When was it created?
  • Where does your eye go first?
Help students see key details.
  • What do you see that you didn’t expect?
  • What powerful words and ideas are expressed?
  • Encourage students to think about their personal response to the source.
What feelings and thoughts does the primary source trigger in you?
What questions does it raise?
2. Promote student inquiry.
Encourage students to speculate about each source, its creator, and its context.
  • What was happening during this time period?
  • What was the creator’s purpose in making this primary source?
  • What does the creator do to get his or her point across?
  • What was this primary source’s audience?
  • What biases or stereotypes do you see?
Ask if this source agrees with other primary sources, or with what the students already know.
  • Ask students to test their assumptions about the past.
  • Ask students to find other primary or secondary sources that offer support or contradictions
3. Assess how students apply critical thinking and analysis skills to primary sources.
Have students summarize what they’ve learned.
  • Ask for reasons and specific evidence to support their conclusions.
  • Help students identify questions for further investigation, and develop strategies for how they might answer them.
In addition, the Library of Congress offers online, self-paced (one hour) professional development modules for teachers which include “Analyzing Primary Sources: Photographs and Prints” and “Copyright and Primary Sources” and also an online LOC: Primary Source Analysis Tool.
National Archives
The National Archives provides a Photo Analysis Worksheet in their collection of document analysis worksheets which also include written documents, artifacts, cartoons, maps, motion pictures, posters, and sound recordings.


USING IMAGES

My favorite list of how to use online tools to improve student visual literacy comes from David Jakes on his Visual Literacy Continuum page. The page has been up for a while, and if some of the links don’t work, you can easily find new tools to use because Jakes explains how to use the tool in his description. For example: “Using a variety of online tools to re-purpose visual information in support of a learning goal…with Filmloop, Bubblr or Captioner.”
Frank Baker has collected a ton of resources for teachers in the area of visual literacy including readings, standards, lesson plans, texts, videos, and journal articles that can help you target the visual literacy skills.
My favorite tool for creating image-based presentations is Haiku Deck. It is available as both an online tool and an iPad app. It has the unique feature of pulling in Creative Commons-licensed images as you type the small amount of text on your slides. Once you pick one of those images, a link to the original source is included with the presentation, as you can see in the upper left-hand corner of the published slide below. I think Haiku Deck’s search only pulls in images that are allowed to be used with attribution, not ones that can be edited. And using Haiku Deck does not teach students about remembering to cite a source, but it does allow students to understand a source citation is needed and this tool makes it easy since the source link is automatically included!
   

CREATING IMAGES

One way to help students understand some of the “tricks” that are used in photographs is to teach them about composing a photograph. The New York Times Learning Network includes a lesson plan (Picture Perfect) which has students learning about the “up, down, and through” shot types. The lesson has them examining samples of each type, reflecting on why the photos were taken in that way, identifying other images with those shot compositions, and creating their own.
With students able to locate Creative Commons-licensed photos that allow modification, they can create their own images by combining (or mashing up) two or more images to create a new image. By asking students to “fool” or persuade the viewer of their new image, the discussion can begin about doctoring of images and what one needs to know to determine if an image is “real”.
There are online image editors like FotoFlexer and Pixlr that can help with this type of project, On the  iOS platform, Adobe Photoshop Mix will let you remove portions of photos and layer one on another. Adobe’s Photoshop Touch app ($9.99) for iOS and Android is a very full-featured image editor for the tablets that can be used in many ways across the curriculum.

How do you incorporate visual literacy into your curriculum? Share your ideas on Twitter! #kathyschrock

Wednesday, September 10, 2014

Bloomin Windows

I recently received an HP ElitePad 1000 G2 for review, and decided to put it through its paces as I created a new set of Bloom's-related applications -- Bloomin' Windows.

HP ELITEPAD 1000

I had not spent a lot of time with a Windows 8.1 Professional slate tablet. I had fooled around with the Microsoft Surface RT a bit, but I was unhappy with the fact RT did not allow the installation of "regular" programs. In addition, the RT tablets could not authenticate on a school network, and I felt their use in schools would be limited.

The HP ElitePad 1000 is a beautiful tablet! It can run the 64-bit Pro version of Windows 8.1 so it will work well on school networks. Its 10.1" diagonal screen will allow it to be used for the Common Core tests and there is also a bundle available that includes Office Home and Student 2013. (The screen is also more readable outside than any laptop or tablet I have used.) There are a full range of accessories available to meet specific needs. 

I received the HP Expansion Jacket with Battery with the ElitePad 1000. It adds 2 USB 3.0 ports, an HDMI port, its own SD card reader, access to the microphone/headphone jack and a battery that is rated to allow you to use the tablet's and the case's battery for a total 20 hours! It does add .86 pounds (450g) to the tablet, but, if battery life is something you care about, it is a must-have accessory. The tablet and the Expansion Jacket re-charge at the same time.

There is also a Productivity Jacket available which might be more suited for schools. It includes a keyboard, 2 USB 3.0 ports, and an SD card slot. It, too, charges as the device charges. The battery life of the tablet is rated for up to 10 hours, so the HP ElitePad 1000 should get through the school day on its own battery.

There are adapters available for hooking up to projectors if you do not have a WiFi projector in your classroom-- both an HDMI and a dual HDMI/VGA adapter. There is also an Ethernet adapter,, a serial adapter, a Smart AC power adapter, and an external USB port adapter. (As with most other tablets, the adapters take up the charging port on the tablet, so you cannot charge the device and use an adapter at the same time.)

HP ElitePad 1000, Expansion Jacket with battery, and USB adapter
 The specs of the Elite Pad 1000 G2 include:
  • Intel Atom Processor (quad-core Intel Bay Trail Atom)
  • 4 GB RAM
  • 64 or 128 GB solid state drive
  • Bright and beautiful 10.1" (1900x1200) Gorilla Glass display
  • Dual cameras: 2.1MP HD (front) and 8 MP with flash (rear)
  • HD audio with 2 stereo speakers
  • SDXC card reader
  • USB port (with optional adapter)
  • Microphone/headphone jack 
  • Up to 10 hours of battery life
  • WiFi (a/b/g/n) and Bluetooth (4G is an option)
  • Weight: 1.5 lbs.
  • Dimensions: 7.01 x 10.28 x 0.36 in. (178 x 261 x 9.2 mm)


BLOOMIN' WINDOWS

After getting comfortable with using Windows on a slate tablet, I began to think about the creation of another entry for my Bloomin' Apps page. A few weeks ago, I received a note from David Lopez, a Microsoft Innovative Educator Fellow. He had created his own version of a Bloomin' Windows graphic. He prompted me to think about the need for one in the many schools that are using Microsoft Windows. I decided to start my own from scratch so I could spend some time investigating the applications in the Windows store.

My goal was to use applications that come with every Windows machine (or are freely downloadable as extras), including the use of the Office Suite applications, and then adding applications from the Windows Store. 

I spent a lot of time combing the Windows store for apps that were available through that venue. I could not find apps to meet all the spots on the grid, so did resort to a couple of Web 2.0 online tools. I understand I could have populated the entire grid with online tools, like the ones I have on this page, since the ElitePad 1000 can use all of those tools. But that would not have helped me learn about the many applications and apps that are available from both Microsoft and other publishers that are downloadable from the Windows Store and usable on the ElitePad 1000 even when it is not online.

I also decided to become more proficient with ThingLink while I was creating this Bloomin' Windows grid. I identified the apps and applications for each level of Bloom's, created the background image for my ThingLink creation, and then used "hot spots" to link out to the applications, apps, and tools. I embedded the Bloomin' Windows graphic on the Bloomin' Apps page, but you can also view and use it below.

Let me know your thoughts via email. Are you already using the HP ElitePad 1000 in your school? What are some cool ways you use it to support teaching and learning? Do you have other favorite Windows apps that are popular with your students or teachers?