kathy@kathyschrock.net

Wednesday, July 27, 2011

Open letter to parents: Laptop choice for college

CC: www.flickr.com/photos/utnapistim/73429019/
Around this time of year, as the back-to-school sales start showing up online and in stores, I receive emails from parents who are asking my advice about which laptop to purchase for their college freshman. Of course, I have to write back and ask some additional questions about their choice of OS, their planned laptop budget, what major the student is planning to pursue, what else besides schoolwork the student wants to do with the computer, if the laptop is going to be the single machine of the student's, and what school their child will be attending.

The last question is really the most important. I have heard horror stories from college students who purchase a laptop online or in the store of a retailer. Then, at some point during college (usually when they need it the most) the laptop breaks down. The student winds up spending hours on the phone with the laptop manufacturer's tech support or winds up being without the laptop for a few days after they drop it off at the retailer's repair shop.

There are tons of laptops on the market to pick from, but my recommendation is for the student to purchase it through their college's online store. Many colleges have standardized on a Windows-OS laptop brand and the Apple laptops. By purchasing the laptop through the college, the student receives an academic discount as well as the peace of mind to realize their college usually has brand-certified repair personnel either on-staff or on-contract. The student can simply walk into the technology department in their college bookstore and get the help they need. (In addition, at this time of year, there are online purchasing incentives with the purchase of a laptop for college. For example, a Windows-based machine over $699 garners the student a free xBox360 and the purchase of an Apple laptop comes with a $100 gift card to the Mac App store.)

Some things to consider:
  • A budget for a laptop that will serve a student well will not cost under $1000. Matter of fact, that should be the starting point. Parents should plan to spend $1000-1500 for this new laptop.  If a student has a decent desktop, and will only be using the laptop for taking notes in class, then a less-powerful and cheaper one (or even an iPad and external keyboard! will work. Most of the price of a laptop is determined by the processor and its speed, the amount of RAM (4 GB minimum!), the video card RAM (512 or better) and the size and type of the hard drive. (The screen size is part of the cost, but, sometimes, the smaller screens carry a premium price!)
  • Even if the laptop is also going to be the student's desktop machine, do not go for the massive 16-17" monster machine. It is way too heavy to lug around and will not fit nicely on a college chair-desk. Keep the weight of the laptop to under 5 pounds. A 13 or 14" (maybe even a thin 15") with a decent resolution will be just fine.  The price of a large external monitor for the student's desk, if the student feels they need a larger screen at times, will be under $150. (I currently like the  Acer S211HL BD 21.5" monitor ($140) because it is really bright and crisp.)
  • Wait until the student visits the college bookstore to purchase their Office or iWork suite, since the academic pricing in the college store is often the best pricing.)
I also am often asked if the laptop will be able to last through the student's college career.  I tell them, with the wear and tear on a laptop that is carried around in a backpack, used everywhere from the cafeteria to the campus bus, it is likely that a second laptop will probably be needed at the beginning of junior year.

Any thoughts to contribute to the conversation?

Thursday, July 14, 2011

Ruminations on the first month of retirement

http://www.flickr.com/photos/
klm_digital_snaps/5910285716/
It has been almost a month since I left the office for the last time and, although I do not think I look as relaxed as those retirees that come back to visit the school, I am getting there!

The ISTE11 Conference was first on the retirement "to-do" list. This year's conference in Philadelphia was just buzzing with positive energy! The sessions were varied and well-done, and the entire event was one of the best ISTE Conferences I have attended. My infographics presentation was well-received and the poster session I co-presented with Kim Conner, my district's middle school ITS, dealing with our "Manufacturing Across the Curriculum" Verizon Foundation grant was fun to do, too!


From there it was on to Hershey, PA to visit a high school friend and then home to get ready to travel to the Berkshires in western Massachusetts to present at the Southern Berkshire Educational Collaborative where I presented to a great group of principals and educators. David Warlick and I tag-teamed throughout the two days, and we seem to complement each other-- his down-home, southern charm is in direct contrast to my rapid-fire New Jersey style, but it seemed to work well!

In between, I have had time to try out all the new tech things that have been introduced. Google+ was released and I had the luxury of time to try to wrap my head around it and to attend and host lots of hangouts with friends and edtech colleagues. It takes some getting used to, but there are plenty of instructional videos available to help you out. And, there was the new Skype-in-Facebook to try out, too-- a one-to-one video conferencing option built into Facebook. It is smooth and easy to use!

I have signed agreements with McGraw-Hill, Follett, and eGenio, all to provide some form or another of professional development over the next year or so. (Watch for announcements of all kinds of Webinars if you are interested!) I continue, of course, to take care of my Discovery Education site, Kathy Schrock's Guide for Educators and will continue with that as long as they will have me!

If you are interested in learning more about the use of infographics as a classroom assessment tool, I am teaching a 9-week, online graduate course this fall through our state ISTE affiliate, MassCUE. And, I continue to teach the Web 2.0 course in the Wilkes/Discovery Education Instructional Media program. You do not have to be in the program to take a course, and the courses are all practical and would support any level and any curriculum.

In addition, since I now have the time, I will be presenting at lots of places during the school year. The list thus far looks like this. It is exciting to be able to have the chance to provide professional development to educators around the country!

People tell me I will miss "school" once September comes. However, as I think about my previous job, which included taking care of the infrastructure, participating in data projects, Web publishing, doing the tech purchasing, meeting DOE requirements and filing reports, monitoring tech support for 1200 computers spread across 8 sites, and providing professional development when it fit into all of that, I realize that I will not miss most of it. I will miss the teachers and students who were the reason I did what I did, but now I can concentrate on what I love the best-- helping teachers with strategies, tips, tricks, and information to embed technology meaningfully into their curriculum to best support teaching and learning!

Monday, June 13, 2011

The times they are a changin...

I have four more work days and then 3 professional days for ISTE11 left in my Massachusetts teaching career. I recently had a taste of my "new" life when visiting Buffalo Public Schools the week before last and Fort Bend (TX) ISD this past week. It is a lot of fun to speak to teachers and learn about their district tech priorities. I think I probably learn more from them then they learn from me!

My plans for retirement are heating up! I am excited to have contracts with McGraw-Hill and Follett in the area of edtech professional development. I will still be teaching my Wilkes/Discovery Master's classes, working on my Discovery page (Kathy Schrock's Guide for Educators) and I have six presentation gigs lined up between now and December!

Spotlight Speaker
Infographics in the Classroom as a Creative Assessment
June 27, 2011; 2:30-3:30 pm in PACC Grand Ballroom B
Poster Session
Using the Manufacturing Process Across the Curriculum to Target Literacies
June 29, 2011; 8:00 -10:00 am in Poster Session Area (Broad St. Atrium #30)
ISTE Annual Conference, Philadelphia, PA
June 26-29, 2011

Presenter
Infographics in the Classroom as a Creative Assessment
Twitter for Administrators
Connecting Your Classroom to the Future
South Berkshire Educational Collaborative, South Barrington, MA
July 11 and 12, 2011

Keynote and Workshop Presenter
Rhinebeck Central School District Superintendent's Conference Day
October 7, 2011

Featured Presenter
4 presentations TBD
GATEC Conference, GWCC, Atlanta, GA
November 3, 2011; Time (tentative): 3:00-4:00 pm and 4:15-5:15 pm
November 4, 2011; Time (tentative): 8:30-9:30 am and 9:45-10:45 am

Featured Presenter
Infographics in the Classroom as a Creative Assessment
Connecting Your Classroom to the Future
Christa McAuliffe Technology Conference, Manchester, NH
December 1, 2011; 10:00am-11:00am and 1:00pm-2:00pm

Keynote
Infographics in the Classroom as a Creative Assessment
R.I.P: Respect for Intellectual Property
Mid South Technology Conference, Memphis, TN
December 8 & 9, 2011

I have a couple of other irons in the fire, too, but news of those will have to wait.

People ask me if I feel nostalgic about retiring from my district. I don't. I see it as an exciting new chapter in my life with the opportunity to grow my knowledge and expertise!

The times they are a changin'....

Friday, May 06, 2011

Moving a video into Keynote (finally!)

Okay, I was determined to use the iPad to present yesterday, so I had created the presentation on the desktop in Keynote and moved it to the iPad through the file sharing in iTunes. I just dragged it to the area next to the Keynote app and it moved over to the iPad the next time I synced. You can see this below. (Fig. 1)

Fig. 1 Moving a Keynote file from the computer to the iPad via iTunes

 The presentation worked perfectly when I tested it via the VGA connection. All embedded movies worked, and things looked great! However, before I presented, I found another great video to use in the presentation. I only had the iPad, and did not know how to get the video into the PHOTOS app on the iPad, which is the only place Keynote on the iPad would pull it from. I tried iWork, DropBox, iDisk, and emailing the file to myself. I could play it on the iPad, but not insert it into the presentation.


It seems as if the only way you can get a video into the PHOTOS app is by using the computer you regularly sync with. I first tried loading the video into iTunes, and syncing, but that put the video in the VIDEOS app on the iPad which Keynote cannot import from.

So, here is my solution.


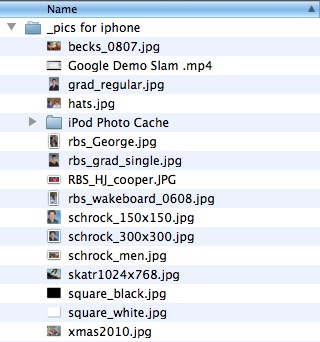
Fig. 2 Folder on computer containing images and videos
Go into the Pictures folder on your computer.

  1. Create a folder (mine is called "_pics for iphone") (Fig. 2)
  2. Put the photos AND videos you want to use with Keynote on the iPad into this folder
  3. Go into iTunes, pick your iPad, and choose the PHOTOS tab.
  4. Chose to "sync photos from pictures" (instead of iPhoto). (Fig. 3)
  5. Pick "selected folders"
  6. Check "include videos"
  7. Check the folder you created which contains your assets.
Fig. 3 Setup in iTunes  for syncing a particular folder of images and videos to the iPad


The items now all wind up in the PHOTOS app, as you can see from the screenshot below. (Fig. 4)

Fig. 4  Photos and the video in the iPad Photos app


Once you open Keynote on the iPad, add a new slide, and chose the MEDIA tab, you can easily chose the video  from the PHOTOS app to embed into the presentation. (Fig. 5)

Fig. 5  Selecting the video file from the Photos app in Keynote on the iPad


And, finally, the video is embedded in the Keynote presentation on the iPad.  (Fig. 6)

Fig. 6  Media embedded in the Keynote presentation on the iPad


You will need to know this process if you are planning to add media to a presentation you create on the iPad or add media to one that you have moved from the desktop to the iPad. I hope this blog post helped you out! (And, by the way, giving the presentation from the iPad yesterday was a breeze!)

Addendum (5/8/11)
  • When creating a Jing screencast sometimes, even after embedding it on Keynote for the Mac and moving the file to the iPad, the video is not accepted. I have found that the best format for videos to put in Keynote presentations on the Mac to make sure they work on the iPad, are mp4s with the codecs of H.264 and AAC.
  • I also found out that embedded audio files in a Keynote for the Mac presentation don't move over to the iPad. I had to make little movies of static images and put the sound files as the audio line in the mp4 in order to play the sounds in Keynote on the iPad.
Addendum (5/13/11)
  • Mike Wakefield sent a comment...."Kathy - I had no problems with a video (h.264) I e-mailed myself on the iPad2; when I touched the reply/fwd arrow in the (iPad) e-mail app, I just hit the "save video" option and it popped it right into my Photos file on the iPad. From there, I was able to bring it into Keynote with no issue." I tried it and it worked like a charm...thanks, Mike!
  • @WebGalPat on Twitter tried a "regular" mp4, and it worked just fine, too! Thanks, Pat!


    Sunday, May 01, 2011

    Learning Keynote for the iPad

    I have moved myself from PowerPoint to Keynote on the Mac in the last year for creation of my presentations. For those of you that do not use Keynote, there is one major difference between Keynote and PowerPoint.

    When I create PowerPoint presentations with linked videos or audios, I had to make sure to bring the media files along with my presentation when I went out to speak. Keynote, on the other hand, embeds all the media files right within the Keynote file itself, so I only have to take one (large) file with me! This is a huge relief for those of us that were always worrried that we might forget one of the linked videos for our PowerPoint presentations!

    When Keynote for the iPad came out, I was very excited since it was very easy to move my Keynote files from my computer through iTunes, iWork, or my iDisk to Keynote on the iPad.  All the sound files, movies and the standard transitions and timings worked great on the iPad. And, once the latest version of Keynote for the iPad came out, and I could see my presenter notes on the iPad while presenting, I began to present directly from the iPad with the VGA-out connector!

    The one thing I had not done was create a Keynote presentation on the iPad itself. I purchased the Visual Quickstart Guide, Keynote for the iPad, by Tom Negrino and found that it is really well-written. As one that learns well from manuals, I read it through it and tried some things out.

    However, an iPad app, Tutor for Keynote for iPad by Noteboom Productions, was recommended by my friend Midge Frazel, and I decided to demo it. It is made up of a series of screencast tutorial videos and is chunked beautifully! The speaker's voice is calm and low-key, and the tutorials are very easy to follow.

    Screenshot from Tutor for Keynote for the iPad

    The screencasts are broken up into the follow chapters:
    • Introduction
    • Presentation Sample
    • Presentation Sample Close Up
    • Keynote Interface
    • Virtual Keyboard
    • Themes
    • Working with Slides
    • Skipping Slides
    • Working with Objects
    • Deleting Slides and Objects
    • Working with Text
    • Working with Media
    • Working with Tables
    • Working with Charts
    • Working with Shapes
    • Hyperlinks
    • Copy and Paste
    • Transitions
    • Magic Move Transition
    • Using Builds
    • Presentation Notes
    • Laser Pointer
    • Sharing
    • Conclusion 
    After watching the entire series of tutorials and experimenting with Keynote on my iPad after each chapter, I realized that Keynote on the iPad is full-featured enough for teachers and students to utilize it for creating their presentations.  You really do not need to have access to a presentation program on a desktop if you have an iPad. With the purchase of the Keynote for the iPad application for $9.99 and this Tutor for Keynote for iPad app for $3.99, you and your students can have both a wonderful tutorial series and the software you need to create stunning presentations with enough bells and whistles to keep any student engaged!

    Friday, April 22, 2011

    Winner of the Lenovo ThinkCentre M90z!

    Thank you to all the educators who participated by populating the spreadsheet with almost 200 interactive tools that would take advantage of the touchscreen on the Lenovo ThinkCentre M90z. The spreadsheet is located here if you are interested in viewing the list of the tools!

    As the rules stated, if there were any duplications of tools submitted, the later submission was deleted from the spreadsheet before I picked the winner. (There were five duplicate sites submitted.)

    I used the Random Name Generator suggested by Richard Byrne, to pick the winner. It is a great little tool and one you should put in your classroom technology toolbox!

    The winner of the Lenovo M90z is Megan Black! 

    Screenshot of the result from the Random Name Generator

    Congratulations to her, and thank you again to everyone who participated! And thanks also to Lenovo and Ivy Worldwide for running this contest!

    If you wanted some other chances to win a ThinkCenter M90z, take a look at the list below for additional giveaway contests!

    Lenovo M90z Giveaway Participants

    Site Start End Date
    Free Tech 4 Teachers Apr 14 Apr 18
    Ilja Coolen \ ICSS Apr 15 Apr 19
    Physician Mom Apr 16 Apr 20
    Scrubd In Apr 17 Apr 21
    Kathy Schrock's Kaffeeklatsch Apr 18 Apr 22
    Steve Hargadon.com
    Apr 19 Apr 23
    Box of Tricks Apr 21 Apr 25
    Clinton Fitch.com Apr 22 Apr 26
    Around the Corner Apr 23 Apr 27
    Tech Savvy Ed Apr 25 Apr 29
    Small Biz Technology Apr 26 Apr 30
    Ablet Factory Apr 27 May 1
    Click Newz Apr 28 May 2
    Geekazine Apr 29 May 3
    21st Century Education Technology Apr 30 May 4
    A GeekyMomma's Blog May 1 May 5
    Marsha Collier's Musings May 2 May 6
    VA Networking May 3 May 7
    Your Virtual Assistant May 4 May 8
    Jake Ludington's Media Blab May 5 May 9
    Mobile PC World May 6 May 10
    Dangerously Irrelevant May 7 May 11
    Bud the Teacher May 8 May 12
    Kikolani May 9 May 13
    Geeks To Go May 10 May 14
    Chad Lehman.com May 11 May 15

    Tuesday, April 12, 2011

    Bloomin' Google redux


    There has been much positive feedback to my Bloomin' Google page (http://kathyschrock.net/googleblooms/) Thanks to all who sent me notes!

    But, through my Google Alerts, I have seen that others are questioning the use of the tool and where I placed things and the limiting of the creativity of teachers. (Geesh!) There were various reasons for its development and why I put things where I put them.
    1. Finding and utilizing ALL of the Google Tools gave me a good 100 hours of experience across the board. I was able to eliminate the tools that are just information sources and focus on the rest.
    2. Being an a avid follower and studier of Andrew Churches work with the Revised Bloom's Digital Taxonomy for the past year, I feel I really understand how it works. I had created, with his permission, my own version of the triangle using mainstream Web 2.0 tools and utilities, and had been showcasing that in various presentations.
    3. As a Google Certified Teacher, I wanted to see if Google even HAD the tools to target each level of the taxonomy. I made the decision as to what level I assigned them to based on my years of experience with teachers and students and curriculum and assessment.
    4. Another of my goals was to introduce teachers to the "less common" tools in hopes they would explore them. I, too, found out so many cool things about the tools while working on this project. I have since adapted my presentation about the Digital Taxonomy to showcase the lesser-known Google tools that can be used at various levels.
    I stand by my choices, and could have included the rationale for why I put things on the various levels. It truly was hard to do, and I put a lot of thought into it. However, I felt it was better if I stepped back and allowed the creative teacher minds to contribute to the spreadsheet of ideas both with their successful practices and ideas sparked by "Bloomin' Google".

    In addition, there has been some chatter as to the Creative Commons license type I assigned to the information I created. I don't want alternate versions out there that are attributed to me. This one is mine,  and you can use it, but think about ways you can develop your own.

    For instance, if you are a content area teacher, create a Digital Taxonomy using the online tools and sites relative to that content area.  (You are the creative content expert, not me!) Provide the justification for what you picked or provide a form for others in your content area to add to the information you present.

    I hope this provides information in addition to the 140 character tweet that announced the project and the previous blog post!

    Kathy

    Sunday, April 10, 2011

    Lenovo Thinkcentre M90z Contest (April 18-22)


    I am part of the second round of the giveaway promotion of the Lenovo ThinkCentre M90z. This promotion, administered by The Influential Network on behalf of Lenovo, has people in various jobs create a contest to support their area of expertise. Each giveaway is run for 5 days and, once it is closed, a single winner from each contest is chosen to receive a ThinkCentre M90z from those who participate in the contest.

    There are a few of us in the educational technology field participating in the giveways, and, since one of the participants has his contest running first and had the same idea as I did, I am going to change my parameters. Richard Byrne will be gathering the information I was interested in and there is no reason to have it duplicated.

    I posted a blog entry about my initial impression of the Thinkcentre M90z here a few months ago. You might want to read it and read up on this great new machine!

    My contest runs from April 18, 2011 at 6am (UTC -4:00) until April 22, 2011 at 7pm (UTC -4:00). The winner will be chosen randomly and announced on this site at 8pm (UTC -4:00). My contest will be open to anyone in education (whether practicing teachers, undergrad or graduate education students, or educational consultants) and will ask participants to contribute an online resource that works well (and is pedagogically-sound) using the touchscreen of the Lenovo.

    Our students are very "into" touchscreens with the influx of tablets into schools and their own personal lives. I have seen young children try to use a desktop computer's screen as a touchscreen, and, of course, it does not work!

    However, this model of the Lenovo Thinkcentre M90z DOES have a touchscreen, so I will be asking you to find some good resources to take advantage of that capability.

    The link to my contest page is here. Below, you will also find links to all of the others who are participating in this giveaway and the dates of their contests (and you will find some really cool new blogs to follow, too!)

    Update April 18, 2011: Link to my contest page!

    Lenovo M90z Giveaway Participants

    Site Start End Date
    Free Tech 4 TeachersApr 14 Apr 18
    Ilja Coolen \ ICSSApr 15 Apr 19
    Physician MomApr 16 Apr 20
    Scrubd InApr 17 Apr 21
    Kathy Schrock's KaffeeklatschApr 18 Apr 22
    Steve Harg
    adon.com
    Apr 19 Apr 23
    Box of TricksApr 21 Apr 25
    Clinton Fitch.comApr 22 Apr 26
    Around the CornerApr 23 Apr 27
    Tech Savvy EdApr 25 Apr 29
    Small Biz TechnologyApr 26 Apr 30
    Ablet FactoryApr 27 May 1
    Click NewzApr 28 May 2
    Geekazine Apr 29 May 3
    21st Century Education TechnologyApr 30 May 4
    A GeekyMomma's BlogMay 1 May 5
    Marsha Collier's MusingsMay 2 May 6
    VA NetworkingMay 3 May 7
    Your Virtual AssistantMay 4 May 8
    Jake Ludington's Media BlabMay 5 May 9
    Mobile PC WorldMay 6 May 10
    Dangerously IrrelevantMay 7 May 11
    Bud the TeacherMay 8 May 12
    KikolaniMay 9 May 13
    Geeks To GoMay 10 May 14
    Chad Lehman.comMay 11 May 15

    Wednesday, March 30, 2011

    Google Tools and Bloom's Revised Taxonomy

    Facts.
    1. Leslie Owen Wilson provides a good overview of Anderson and Krathwol revised Bloom's Taxonomy which was updated in 2000.
    2. Andrew Churches developed a model, called Bloom's Digital Taxonomy, to highlight the use of tools and technologies at each level to facilitate learning.
    3. Alex Ambrose (2009) created a site dedicated to his idea of Googlios, the use of Google tools to support the creation of student ePortfolios to enhance their personal learning environment.
    After looking through the wealth of information offered by Andrew and Alex, and having already developed my own version of Bloom's Digital Taxonomy with my favorite Web 2.0 tools for students to use at each cognitive level, I decided to combine the two-- a Bloom's Digital Taxonomy using ONLY the suite of tools offered by Google.

    Boy, was I surprised! Even as a Google Certified Teacher, there were so many cool new tools that I did not know about! Google has purchased some already created, and there are some neat ones in Google Labs, which, hopefully, will "graduate" soon and become part of the core group of Google Tools.

    I explored 51 Google tools as I figured out how they met Andrew's criteria for each level of the Bloom's Digital Taxonomy. I justified their use, and some appear in all levels, some in various, and some only in a single level. In my presentation about "Connecting Your Classroom to the Future", I am redoing the section which highlights Web 2.0 tools and highlighting instead the "less-mainstream" Google tools.

    I developed a clickable graphic to allow educators to make their own judgments on how the tools can be used to support student learning at each level. I know you creative educators will come up with great ideas to for their use. (Hum, I think I will add a Google form to that page to allow educators to contribute their ideas, too!) The screenshot of the very busy graphic is below, and you can find the information and clickable graphic at this URL: http://kathyschrock.net/googleblooms/


     Let me know via email or comments or Twitter what you think of it!

    Saturday, March 12, 2011

    First impressions of the iPad 2

    Well, I ordered the iPad 2 at 4am yesterday morning, but it was not going to arrive for more than a week, so I just went to my local Best Buy and was able to get the same model I had ordered in my hand today! (Online inventory reporting is a great thing!) Got the white, 64gb, WiFi & 3G, AT&T version.

    With a simple call to AT&T, I was able to transfer my unlimited data plan to the new iPad 2 without a problem. (Hint for anyone else who is planning to do that-- sync the new iPad to your iTunes account and transfer all the stuff from your old iPad over before you call, so you do not have to stay on the phone for 30 minutes with AT&T. They were very helpful, but wanted to make sure the transfer of the account worked, so I had a lovely conversation with the agent about any number of things as all of my data and 253 iOS apps and 700 songs moved to the new device!)

    Reasons I purchased the new iPad 2
    • Craved the mirroring of the screen via the VGA dongle which makes training and showcasing apps oh-so-nice! I know, I could have jailbroken the old one, but did not want to go that route.
    • The two cameras, one for Facetime and one for photos and video so I can now use all my cool iOS photography apps on the iPad. I can also take movies and dump them right into iMovie or ReelDirector on the iPad 2.
    • Reportedly (and oh-so-true!) faster app launches 
    • I so wanted a white iPad. I was tired of the black-on-black color scheme.
    Mirroring of the iPad 2 onto my TV


    Things I did not really care about but which are very nice
    • The new one is thinner than the original but very sturdy
    • It is lighter, too, but it does not really seem that it is 15% lighter.
    • The new cover, which I was not going to get, but did. Besides keeping the screen very clean, the ability to type on the slant and, more importantly, hold the folded back cover in your hand as you use the iPad, is a big plus. Plus the magnetic way it attaches and turns the device on and off is very neat!
    If you have any questions or want me to try some things out, please let me know!

    Monday, February 28, 2011

    Lenovo ThinkCentre M90z

    Lenovo's ThinkCentre M90z
    I have recently received a permanent evaluation unit of the Lenovo ThinkCentre M90z to both put through its paces and to consider ways it can be used in the K-12 arena. I am part of a second round of evaluators, all of whom have a different career, who get to use this new machine and blog about it.

    The ThinkCentre M90z is a very cool machine! The first thing that I tried out was its touchscreen, which Lenovo calls the "multitouch panel".  Of course, it comes with the requisite keyboard and mouse, but you can pan and zoom and rotate and right-click just using your fingers on the screen! The intuitive nature of controlling by touching is a feature we all have become accustomed to with our small tablets, but having that ability on this desktop's big screen is awesome!  The ThinkCenter M90z also comes with bundled software that allows you to control some of the hardware functions via touch.

    Now some geek speak...the ThinkCentre M90z is a one piece, all-in-one desktop with a 23" widescreen with full 1080p HD resolution. It has an Intel Core i5 processor and 4 gigabytes of RAM and runs Windows 7 beautifully! The M90z has a Web cam and mic, and also has some additional unique features. It has a DisplayPort connector, like some laptops do, to allow you to hook it up to another monitor or an LCD projector for whole-class viewing of the info on the ThinkCentre M90z computer with an optional cable. However, the computer also comes with a VGA-in port, which means you can hook up your laptop or iPad to the desktop and use the ThinkCentre M90z as a large-screen monitor, too!

    iPad projecting through the VGA-in port on the M90z

    The model I received has six USB ports, so, with the purchase of an external USB 802.11x wireless adapter, you can put this one-piece unit anywhere you can find a single electric outlet! Of course, it has an Ethernet port, too, but it is nice to think you could place this computer in a public place for access by students or staff!

    If you want to read more about the specs and watch it in action, take a look at this page. And the link to the user manual can be found here.

    There will be the announcement of a promotion soon, as there was in December for the first round of evaluators. I am not yet sure what the "prize" might be for the promotion I am going to sponsor, but, suffice it to say, if you take the time to read about the Lenovo ThinkCentre M90z and think of creative ways it can be used in the K-12 classroom or school, you will be ready for any promotion I launch!

    Wednesday, February 23, 2011

    iPads in the Classroom

    I recently attended a workshop covering the use of the iPad for administrators. I went to support my administrators as they learned everything from unboxing to syncing to installing apps.  As I was sitting there, I realized what was needed, to move the "one-to-one with tablets" initiative ahead, was a workshop which covered the reasons to use these devices to support teaching and learning, included an overview of successful practices already in place, and showcased lots and lots of apps in all content areas at all grade levels. I am in the process of developing such a presentation (The iPad as ePad) and it could not be more fun to put together!

    My first step was to create a Web page to include links to tutorials, reviewed apps lists created by others, items specific to special education using the iPad, and pointers to some articles by those already using the iPad with students. Take a look at it if you get a chance. http://linkyy.com/ipad

    There is also a Google form on that page to add your favorite "iPad in education" list of apps or blog or lesson plan or ideas page. Please take the time to share if you know of a great resource!

    iPads in the Classroom Support site (http://linkyy.com/ipad)

    Saturday, January 22, 2011

    Tech Ramblings

    I have not posted to the blog for almost a month! I apologize for that, but I have been busy getting presentations and grad courses ready for various upcoming events!

    One that took me a long time was the "history of technology" presentation I am doing at NCTIES in Raleigh in early March. I had put together a 20-minute movie on the topic a few years ago for our MassCUE anniversary celebration, but I did not do any talking. I had to figure out how I was going to adapt the content I had already collected and gather the four additional years of technology coolness and present it for a break-out session.  I did manage to do it, and the resulting presentation was as much fun to put together as I hope it will be for my audience to watch! I created a "technology scrapbook" of my personal tech acquisitions over the years, and included personal photos and all kinds of other fun things! (However, I probably cannot share the presentation outside of a conference space, because, as you can well imagine, I did not get permissions for all the gadget photos I have included in the show!)

    I also have been busy learning some new software interfaces, most notably the new version of Adobe Connect 8 and the new Adobe Acrobat X. The components of both have been improved and the navigation has been made easier, but it still takes a while to adapt to new interfaces. Adobe Acrobat X has some exciting new accessibility features, too! I have also been using the new Apple iLife suite, mostly iMovie, and am taking advantage of some of the new features.

    I have perfected my "Using Infographics as a Creative Assessment" presentation for ISTE11 in Philadelphia. I am sold on this alternative assessment practice, and, if you attend the session,  will help you see how great it is, too!


     That's it from kinda snowy, but very cold, Cape Cod! I am looking forward to attending FETC in Orlando next week and will be helping in the DEN pre-conference and doing two featured sessions. I hope the weather is at least sunny for me!

    Thursday, December 30, 2010

    Project 365 (Rewind)

    Well, the last photo is posted and it is bittersweet. No more going out at 6am to get just the right light on that very special door. No more going out at 6am in order to stand in the middle of the road to get just that right angle for that perfect door photograph. No more surreptitious photos of doors out the window of the car while driving by a house. No more trying to act casual as I photograph a series of doors in the same neighborhood as I stroll down the street (and not appear as a stalker). No more making every family member turn around or park by the side of the road as I jump out to take that very special door photo. No more 30 mile drives to get that great door since I did not have my camera handy when I saw it the first time. No more editing of house numbers off of the photos so I do not put anyone's home at risk.

    I will miss all these things, and will continue to see doors everywhere I go for a long time to come. This project, which required me to take a photo a day for a year, was a really fun project! I did not really take a door photo each day, since I found some streets with stretches of really nice doors and used them for an entire week. However, I did take door photos wherever I was, and even lamented when there was a storm door over a really awesome door. (The reflection off of storm doors is awful for photos, so I only took a very few of those.)

    I received a small number of "guest" doors (and the guest door idea came from Roberta Sallee, BTW) from some of my buddies and relatives, Bodie Fulford, Bob Cotter, my mother-in-law, my dad, my mom, Melanie Holtsman, and one other (who I forget). I appreciate them taking the time to gather some photographs to enhance my project.

    During the year, the gallery of doors was hosted on my Mobile.me Gallery. This allowed RSS aggregation and an automatic Twitter feed each day to my stream to alert people to the new photo. The funniest comment of the year came when I posted the "Adobe Door". One follower wrote and told me he was expecting a door on an adobe building, somewhere out west. In reality, it was the door at the Adobe Software Headquarters in San Jose while I was there for the summer institute.

    I have moved all of the photos to Flickr, and here is the link http://linkyy.com/schrockproject365 to the set.

    Below is the embedded slide show from Flickr. Thanks for all the kind words and comments throughout the year!

    Monday, December 06, 2010

    The Twitter Year in Review

    Since much of my "best" work is now done in 140 characters (or less) on Twitter, I figured I would try an embed of my last 100 posts to my Twitter feed as my year-end post. For those of you that do not tweet, this will give you a good idea of the items that I share on Twitter. Of course, this list will continue to change as I add new tweets. Maybe you will be convinced to try Twitter or add my Twitter feed to your Google newsreader! (You can see more here if you are interested!)


    Wednesday, November 17, 2010

    My Global Education: What I learned this week

    I have been to Europe and Australia in the past. However, I have not had the time to really get out and about and become familiar with the culture of the places I have visited. I arrived two days early to the ECIS (European Council of International Schools) Conference in Nice, France. I had a little time to explore, and I learned some things here in France.

    I know many of my respected colleagues in my PLN teach in other parts of the world, in both international schools and DoDEA schools, and I will be meeting many more this week at this conference. I live in a rather sheltered spot, Cape Cod, MA, and this week has made me realize that we must have our students become comfortable with dealing with people from other parts of the world.  This is nothing earth-shattering to most of you, but it really became apparent to me this week. Can we successfully do this virtually? Probably not to the extent we need to acclimate our students, but technology can play a big role in at least starting the process of global and cultural understanding.

    Here is what I learned this week.

    It is lonely if you do not know the language of the country you visit. I could not engage in any small talk with anyone. That was hard for me.  After being immersed in the French language for two days, and reading it everywhere, I can now understand signs, menus, and basic items. I do not even begin to say anything but thank-you, please, hello, and good-bye. Oh, and "I cannot speak French." Note to self-- always help non-speaking visitors in the US whenever possible.

    Everyone in Nice has been more than helpful. I tried to pay the graciousness forward by taking lots of family photo shots for other tourists, from wherever they came.

    I realize I can follow a map written in another language without knowing that language. However, I miss having GPS and interactive maps on the phone since I have no phone plan here. I had to download PDF maps to get around. Using the cell phone camera, however, helped me to leave a trail of bread crumbs so I could get back to transportation hubs and such.

    People on subways act the same everywhere, even with no conversation involved. I was proud I figured out how to use public transport, even if someone had to show me how to purchase the tram ticket. No conversation necessary, just a lot of gesticulation!

    One needs to notice when one is walking in the bicycle-only lane on the Promenade Des Anglais along the beach in Nice. Enough said.

    One has to wear black here. Everyone does. And since Nice is a summer resort, everyone bundles up with scarves and mittens when it hits 50 degrees. I am thinking the weather is spring-like, as the New England cold weather has already begun to show up at home.

    Everyone has a scooter-type motorcycle like mine! However, ATVs are street-legal and I even saw a regular motorcycle with two front wheels! (I want one of those.)

    Now, after two days, I am feeling more comfortable, but certainly not totally. If our students have the chance to communicate, both synchronously and asynchronously with others, I think we should all make that happen. There should be no worries about streaming chat software, screen-sharing, and the like. Just make it happen to allow students from whatever country gain a better understanding of both what is the same and different about each other. Au revoir!

    Here is a slide show of my photos for the past two days. (The Flickr set contains the object in the photo in the title of the slide.)


    .

    Saturday, October 30, 2010

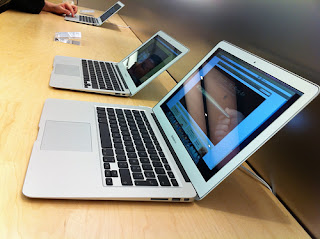
    Macbook Air 11.6"

    I had the first Macbook Air a few years ago for about a minute and a half. It was so slow and underpowered and it had that weird door that dropped down to plug things into that nothing could plug-in to! I sold it after a very short time.

    I wavered on the purchase of the new Macbook Air for almost 24 hours, and, for those of you that know me, you will realize this is odd. I had done all the research ahead of time, drove to an Apple store to see one (but they had not received one yet), and talked to some very smart colleagues who talked me out of it.

    Photo by http://www.flickr.com/photos/rsepulveda/5104919191/

    I then polled my Twitter followers, but no one had yet touched one, let alone purchased one. However, I looked carefully at both the specs and the hype, and decided to get the 11.6" version,  doubled the RAM to 4GB, doubled the SSD to 128GB and upgraded the processor to the 1.6 GHz. I did not want to get caught with an underpowered machine again, but the total price was a little daunting!

    I cannot believe this little machine! It is powerful enough to do Second Life (my avatar is iffy, but everything else renders perfectly!), it can video edit using Adobe Premiere Elements 9 for the Mac, and opens all apps so speedily, it takes your breath away!

    I restored a Time Machine backup of my Macbook Pro and the new MBA was all ready to go! With the smaller amount of internal storage, I did uninstall most of the Adobe CS apps, but kept the ones I am most likely to use away from home like Dreamweaver and Acrobat Pro.

    After the install of all my applications, I have about 60GB of data storage left, and that is fine for my purposes. With so much of my data available "in the cloud" and on my home computer via "Back to My Mac", I am all set by having everything available to me all of the time!

    I miss a couple of things so far. Not the optical drive, but the back-lit keyboard and SD card slot. The larger model has the SD card slot, and I know that the battery life is longer without the back-lit keyboard, but I still wish it had it.

    I have to remember to carry both the VGA dongle and the Ethernet dongle with me now, but that is not a problem. I have hooked the computer up to a older projector and the "non-standard" resolution works just fine.

    Please feel free to ask any questions in the comments of things you want me to try out or concerns of yours I might have missed!

    Kindle 3 Overview

    I have been using the Kindle 3 for a couple of months, and also using the iPad to read my Kindle selections, and I wanted to offer a few additional thoughts.

    I still enjoy reading my books on the Kindle because of the electronic ink and the lack of backlighting, which makes it much easier on the eyes for long periods of time.

    The added weight of the Kindle when in the case with the built-in light has not been noticeable. Folding back the cover when reading works well, so I have not taken it out of the case to read at all.

    I do like having the 3G version for both purchasing and previewing new titles, and for using the Web browser anywhere I am. Of course, the iPad wins, hands down, for Web browsing, but the Kindle works in a pinch to check e-mail, tweet, or get ready-reference information. (I am one of those people who feels the need to have access to the Net and information with me 24x7, so I always can make do with the tool I have on hand!)

    I have a more complete review of the Kindle 3 here, if you are interested.

    Below you will find links to the two versions of the Kindle 3, the WIFi-only and WiFi/3G version and also links to all the apps for reading Kindle books on other devices. One of the main reasons I prefer the Kindle device is the number of titles available in the Kindle bookstore.


    Sunday, October 24, 2010

    One more IPEVO device

    Okay, audio-conferencing and attending Webinars just got a lot easier for me when I have a group of staff members watching and listening with me.

    The problem always was lack of a speakerphone. I managed to solve the problem by purchasing Skype-out credits so I could dial-in to the landline we needed to connect to via the computer, so we could hear and participate in various online webinars. If the hosts used VOIP, we were all set for audio, but still each had to come up to use the microphone on the computer to ask a question. And, for simple conference calls, it got a little bit crowded as everyone huddled around the speakerphone in my office.

    IPEVO X1-N6 Internet Conference Station

    Well, I can now go mobile with the IPEVO X1-N6 Internet Conference Station ($139)!  This device is both a USB speaker and a USB microphone. I will simply have to bring the laptop to a conference room, plug in the IPEVO Internet Conference Station to a USB port, log-on to the webinar, choose the device as both the audio input and output devices, and everyone in the room will be able to clearly hear the webinar over the speaker in the Internet Conference Station, as well as easily contribute to the collaborative conversations that might occur. The device also has a mute button to mute the local sound when just listening to the online presentation.

    However, the Internet Conference Station can be used ANY time one wants to get a group together to discuss something. For example, students creating an audio file as the backdrop for a slide show or movie can just plug in the device and each can easily add their thoughts. I also see the device being used by a student podcaster who is interviewing a small group of students, staff, or community members. The Internet Conference Station can be chosen as the audio input for apps such as Jing, GarageBand, Audacity, Adobe Connect, Microsoft PowerPoint, and any other app that allows the choice of the audio input device.

    If you have any ideas on how the IPEVO Internet Conference Station might be used in an educational setting, add a comment! Thanks!

    Friday, October 15, 2010

    New Gadgets from IPEVO

    I am starting to appreciate IPEVO's innovations more and more! Even though they are a consumer-oriented company, many of their items are useful for schools and support of teaching and learning. Of course, the IPEVO Point 2 View document camera has been a big hit in my district and everywhere else I demo it.

    I got the chance to take a look at three new gadgets from IPEVO. The first is the Icon Power Pack for iPhone and iPod, an external battery charger for these devices. I have used the Kensington Mini Battery Pack for a number of years, and have always been happy with it. I cannot tell you how many times an external battery has helped me out, especially with the earlier iPhones with the shorter battery life.


    The Icon works in the same way. You charge it via a USB port on your computer, then, when you plug it into the 30-port connector on the iPhone or iPod, the handheld recharges itself from the Icon. The blinking lights on the Icon let you know how much battery life is left for charging.

    The Icon is rated to give 3 hours of additional talk time, or 5.5 hours of Internet use, or 18 hours of additional audio playback for the iPhone 3/3gs or iPhone 4. I can definitely see having a few of these on-hand in classrooms that are piloting 1-to-1 iPod or iPod Touch initiatives, especially when going out in the "field".


    The second gadget I tried out was the Open Stereo Headphones. These headphones are the over-the ear type, sit outside of the ear canal and are quite comfortable. They have an in-line remote and mic for use with iPods and iPhones. However, the coolest feature is they allow you be aware of external sounds even while listening to music with the headphones on!

    I tested it out today in a 7th grade computer class, where students were working on projects, and discussing content and navigation and set-up aloud the entire time. I could easily listen to music at a fairly high volume, and still hear what they were saying as well as the teacher giving instructions. I let a few of the students try them out, too, and they were impressed. If a computer lab had a classroom set of these, there would be no more hand signals or flicking off of classroom lights to get the student's attention. In addition, students would no longer have to raise their voices (as 7th graders are wont to do) when both wearing headphones and talking loud when trying to get the attention of another student.

    When I showed them to the computer teacher, her only concern was examining them to see how rugged they were, since they would have to put up with five classes of middle schoolers each day. I am not sure of that, but I do know there are not many larger, more expensive headphones that have been able to withstand the middleschooler, either!


    The third new gadget I tried out was the one I had the most fun with -- the IPEVO Tubular Wireless Speakers.

    These portable speakers come connected together in an easy-to-transport tube. To use them, they twist apart to reveal a USB connection for charging with the computer in the base of one and an audio cable to connect the speakers together in the base of the other.


    These speakers attach to the iPod, the iPod Touch, and the iPhone via a Bluetooth pairing connection, and they should work with any laptop or device that has Bluetooth capabilities.

    I easily paired them with my iPad, and then carried the speakers throughout my house, streaming the music wherever I went! In a classroom setting, these would be very useful for sharing audiobooks and podcasts in small groups of students, or even with the entire class.

    (One tip: I found that I needed to make sure the two speakers were attached to one another via the audio cable BEFORE doing the pairing with the iPad in order to get sound from both speakers.)

    Can't wait to see what IPEVO comes up with next!