Friday, February 28, 2014

Sketchnoting in the Classroom


Way back in 1999, I was asked to be part of a team to craft the goals for the second version of the US DOE National Technology Plan.

There were about fifty people in the room, from all areas of education. We had lots of discussions, then jigsawed to share thoughts, then shared out with the whole room, then had additional discussions with our new group, and then moved to more jigsaws to share, and then, again, sharing out publicly.
However, as this was all going on, there was a gentleman who was sketching the whole-group sharing discussions on big pieces of chart paper that lined the room. I was fascinated watching him take our verbal ideas and turn them into visually-beautiful works of art that represented exactly what we were saying! He never asked a question or for a clarification of the content.

During a break, I went to talk to him and asked him how he knew so much about educational technology that he could keep up with us as we both raised our hands and, sometimes, interrupted others. He told me he knew nothing about the content we were discussing and his company did this same type of visual notetaking for any content area or company. I was then TRULY amazed!
On that day, these great works of art were photographed, and they were shared on the Web for a bit, but they are long gone. Fast-forward to today, and these same visual notes are starting to be created using digital tools. For whole group sharing, the visual notetaker is usually using a tablet device, drawing software, and projecting the results to a large monitor. They are easily saved this way, but the participants cannot usually view them all at once. Even if the visual notes are created with pen and paper and then photographed or scanned, there are many new places to share them online. Visual notetaking is both an art and an organizational tool.

THREE TYPES OF VISUAL NOTETAKING

There are various ways visual notetaking can be used. The first, as my story outlines, is about the notetaker visually recording what is taking place in a meeting or lecture. The notetaker is not a participant in the conversation.
The second type of use of visual note-taking occurs when the facilitator of a meeting or group is the one creating the visual notes. He or she is interacting with the others as the notes are created. As the facilitator, he or she may also be sparking additional conversation by adding elements to the visual notes to spur new avenues of thought or to keep the group on task.
The third use of visual notetaking is now being used by many students and teachers and is commonly called “sketchnoting”. Sketchnoting, in its purist form, is creating a personal visual story as one is listening to a speaker or reading a text. I also believe the interactive notebook, which includes the process of taking “regular” notes” while listening to a speaker and later creating a sketchnote of the text notes, should also be considered sketchnoting.
My friend, Tracy Sockalosky (@tsocko) who has just begun to sketchnote, was attending the EdTech Teacher iPad Summit last week. Here is the link to the presentation she sketchnoted.  Tracy has just begun to sketchnote, but, as you can see from the image below, she is really getting it!


PURPOSE OF VISUAL NOTETAKING

What is the purpose? Why should one draw and connect thoughts and ideas visually? The research is clear about the benefits of visually representing content and it is based on the research in the area of Allan Pavio’s dual coding theory. I am no expert in the theory, but I have found that this Education.com article by Mark Sadoski does a good job of providing a general overview and references for the work of Paivio.
In addition, there is an extensive article by James M. Clark and Allan Paivio that provides some of the research into the relationship between the dual coding theory and education. It includes everything from teacher education to learning, memory, and study skills.
Ben Norris created a Slideshare about sketch notes and includes his version of an image to illustrate the dual coding theory. The image was created by Sunni Brown and re-created by Norris.


INFO AND RESOURCES FOR YOU ON SKETCHNOTING

I have done a lot of reading and watching on the topic of sketchnoting, and all the tutorials and overviews state that one does not have to be an artist to sketchnote. It seems to be all about learning how to listen and how to plan and organize your sketchnoting. One way to practice sketchnoting would be to watch a short Discovery Education Streaming clip and sketchnote the content. Pretend you are in a graduate class or at a conference lecture. This would also be a great way to provide professional development for your teachers and students in sketchnoting. Their sketchnotes could serve as an introduction or summary of a Discovery Education Streaming video!
Here is a well-done video about visual notetaking so you can learn more about it.


I have also recently created a support page with resources for learning about sketchnoting in education and tutorials on how to sketchnote.

Do you sketchnote? What tools do you use? Have you posted your sketchnotes and would like to share them with us? Have some favorite sample sketchnotes or tutorials? Email me or find me on Twitter @kathyschrock with any resources…thanks!

Sunday, February 23, 2014

IPEVO Video Stand

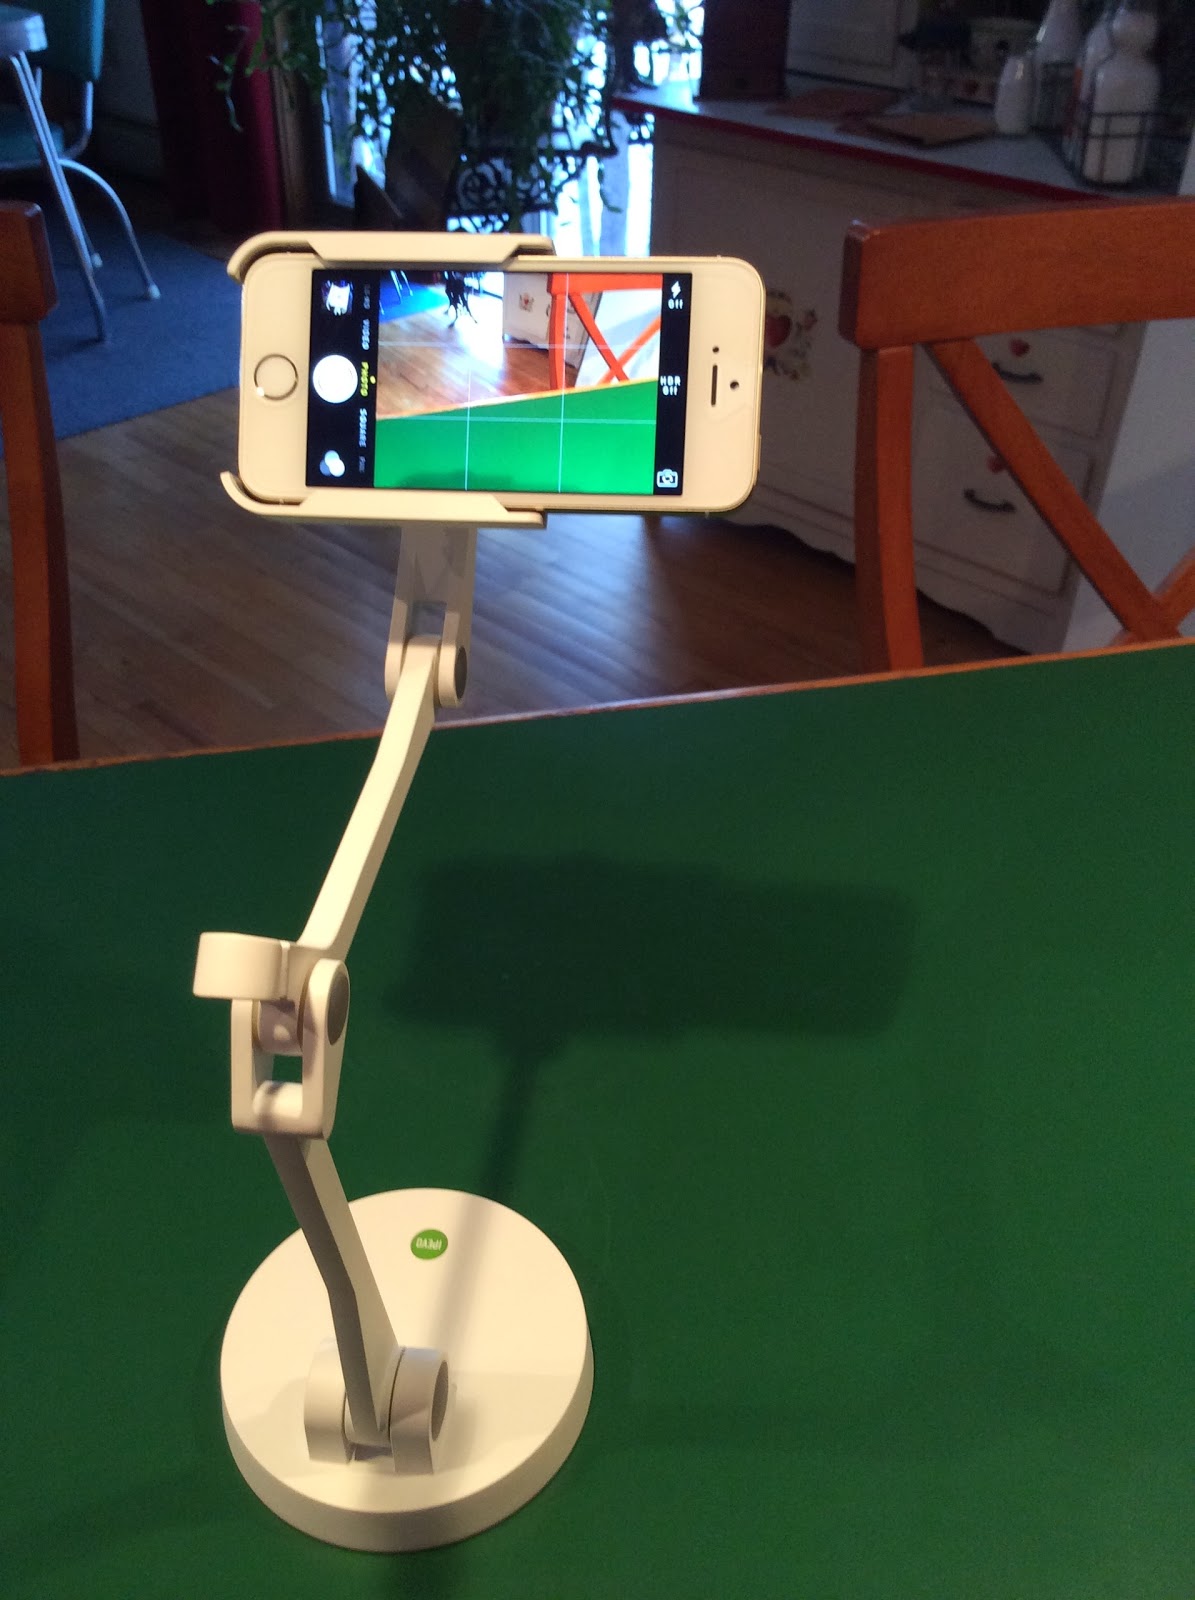
IPEVO Articulating Video Stand
IPEVO has come up with another winning device to help teachers in the classroom-- the IPEVO Articulating Video Stand for iPod and iPod Touch.

This useful product holds your iPhone or iPod Touch in a sturdy metal stand to allow you to use your iDevice in any number of ways.

The unique holder has springs which enable you to spread the holder open to easily insert the device and then gently release the springs.


The holder with the springs


The holder can rotate easily to allow you to have the device in the direction you need it to be.


Using the device as a doc camera
By hooking up the iPhone or iPad Touch to a VGA projector or Apple TV, you can use it as a document camera, as shown. You can see that the articulating arms allow you to put it as close or far away from the item being projected as you need to.

You can also use it for recording a video of a process for students or when editing an essay paper.

Another great use of the IPEVO video stand is to use it to hold the iDevice steady when using animation software and the camera on the device to make an animated movie. When making an animation movie, it is important to be able to have the camera be steady.


Using the front camera on the device


You can also use the front camera on the iPhone or iPod Touch and hold the item steady while having a Facetime or Skype video conference.
The IPEVO Video Stand can articulate in many directions and heights to allow you to project or photograph items from small to large. The weighted base keeps it sturdy at all times!

The IPEVO Articulating Video Stand comes in black or white and sells for $69.


Monday, February 10, 2014

Google Glass in Class

I was contacted to have an interview with a CNN reporter about Glass use in the classroom. I knew I could not participate in the interview because of some family events, so I just wrote a lengthy email with my thoughts. The article came out on February 10, 2014, included a a bit of what I wrote about, but I wanted to share the full text of my thoughts.


An an educational technologist, a Google Certified Teacher, and in my role of ISTE Board member, I am always thinking about the role technology can play to improve teaching and learning. It is not about the technology, but about having a choice of tools available for students to support their learning. Educators are bringing blended learning and project based learning into the classroom. Students are researching, collaborating, and creating projects and products to showcase their mastery of content by using technology in meaningful ways.

Wearable technologies, such as Google Glass, are  beginning to be used by teachers and students to support the instructional process. Teachers and students are sharing the ways they find to include Glass seamlessly into the curriculum via blogs, Twitter, and Google+ postings. Even though there may be only one pair of Glass in a classroom, the ability to screencast what the wearer sees and project it via an iOS or Android device, opens the world of Glass to everyone in the room. The ongoing development of applications to be installed on Glass, called Glassware, also provides various tools that can be used in the classroom.

Some of the uses of Google Glass in the classroom include

  • Students or teachers creating videos through the eyes of the wearer to share with others. These videos can be recorded and shared via YouTube as well as be shown in real-time by starting a Google Hangout.
  • When wearing Glass, the wearer can use both of their hands, and can easily document a science lab, presentation, or other  class-related event and post that up to a class Facebook, Tumblr or Google+ account, all via Glass.
  • WordLens is a Glassware app that translates what the viewer is reading to and from many languages. This can be very beneficial to a second language learner in the classroom.
  • For students with physical handicaps, being able to search the Web via their voice as well as easily send  messages to a classroom backchannel, Twitter, or the teacher, can assist them with various classroom tasks.
  • For students who are interested in developing applications, Google Glass provides another avenue of developing for a specialized device.
The possibilities are endless as more applications are developed for the device and as Glass gets into the hands of more teachers and students. There are many educators in K-12 who are documenting how they are using Glass in the classroom. Educators are always eager to share and help one another!

One great project is Margaret Powers (@mpowers3) “365 Days of Glass Project”.  (http://http://365daysofglass.com/) Each day she documents how she and the students are using Glass in her schools. Recently, she recorded kindergarten students in her Maker Club, as they create flowers out of cups, cardboard, and additional materials. And the next day, after their unit on snow, the kindergarteners wore Glass to record images and videos of the snow outside and share them with classes they are collaborating with in Brazil and Singapore. The first-person perspective on her site becomes instructional for other teachers and makes it easy for them to replicate the lesson or project in their own classroom.

Ms. Powers is also spearheading a global collaborative project between her K-2 students and other classes around the world who want to participate in virtual field trips and Google Hangouts to exchange cultural information and learn about other places in the world. These include classroom tours and first-perspective lessons. (http://globalclassroom2013-14.wikispaces.com/The+Global+Google+Glass+Project)

An interesting pilot project that should provide teachers and students with more ways that Glass can be used in the classroom is the one at Lufkin Independent School District in Lufkin, Texas. The middle school students are encouraged to wear Glass and come up with ways for it to be used in school. As more schools get Glass in the classroom, there will be widespread sharing of thoughts and ideas.

Having a single pair of Google Glass in the classroom reminds me of the days of the one-computer classroom. Everyone had to wait for a turn to use the device. I think once we see a K-12 school pilot with a classroom set of Glass, there will be many more practical and creative uses showcased.

Resources for the support of Google Glass in Class
Google Glass in Class Resource Page

http://www.schrockguide.net/google-glass-in-class.html

Google Glass in Education Google+ Community

https://plus.google.com/communities/107609996462187425150

What are your thoughts about Google Glass in the classroom for teaching and/or learning? Email me or find me on Twitter @kathychrock

Saturday, February 01, 2014

Curation tools are cool!

I have been curating online resources since 1995– finding links for teachers, organizing them into categories, providing descriptions of the resource, and posting them on a Web site. However, that was in the Web 1.0 era when all teachers could do was read and click on my resources.
Fast forward to today. There are tons of tools that allow me to easily gather links, organize them, and annotate them with information for teachers. The big difference now is teachers can also utilize the same tools to gather, or curate, taking some from my collections, and organize them in the best way for their students. These tools used to be called social bookmarking tools, but now are more popularly known as “content curation” tools.

Overview and Information

Curation tools can be used by educators to provide up-to-date, organized information for students or colleagues, for students showcasing their relevant organization of Web resources as an assessment, or as an easy way for students to gather assets to use in a project. Curation is different from automatically aggregating data with a newsreader, like Feedly. Curation includes the curator exploring and evaluating the items before curating them. The curated items often include a description of how they might be used or what they contain, developed by the person doing the curating.
Nancy White has been studying curation and is a noted expert in the field. She  penned an article entitled “Understanding Content Creation” in which she describes her goal of coming “up with a framework to define curating in the educational sense, in order to answer the question of what is the value-added of curating, vs. collecting information”. It is an interesting model and she also maintains a scoop.it page about curating learning resources.
Stacia Johnson and Melissa Marsh created a video explaining why and how they curate information and they reviewed several of the most common tools used in schools.
Lnash, from Australia, has posted a SlideShare presentation that does a nice job of explaining how and why teachers and students need to curate information for their specific needs.

Curation Tools

There are hundreds of tools that can be used for curation purposes.  Some curation tools, like Diigo , PinterestScoop.it,  and Livebinders, have been around for while, and are used quite a bit in schools. I wanted to try some that I had not used before and give you a little overview of the features. The descriptions and feature sets are not intended to be exhaustive. I created an account, tried the tool out, and am sharing my first impressions.
Bag the Web is an easy to use curation tool. You add links to sites or use the search function built into the online tool to find links. There is a Chrome extension and bookmarklets for other browsers to allow the user to easily add resources to their “bags”. Bag the Web supports media embeds from many popular media sites, allows titled sub-headers to be added to a list to organize it a bit more, and allows longer text sections to be added, making some bags look more like Web pages! In addition, you can embed your bags on your own Website or blog. And, as with other social creation tools, you can re-bag someone else’s content into your own bag! Here is a sample bag entitled “Exploring the Possibilities of iPads for Learning“.
EduClipper is a curation tool that has been specifically created for education.  You create eduClips from your computer, the Web, and Google Drive. You then organize the resources into eduClipboards which you can share with colleagues or even work on them collaboratively. It is easy to create classes or groups of students with whom to share your clips, too. You can align the content you are clipping and sharing to the CCSS and the ISTE standards. There is even a feature, powered by EasyBib, that automatically generates the citations for content that has come from the Web. There is a new, great iPad iOS app for EduClipper, too! Here is a sample eduClipboard of cool tools created by Adam Bellow, the developer of EduClipper.
Listly is just that– you create lists of sites or items and can both write a description and add a tag. The free version only includes a URL that you can share with others. If you want to make the list public, you have to get a paid subscription. You can add to other peoples’ lists, embed you own lists or their lists on your blog or Web site, and use a bookmarklet to easily add an item to your listly. Many educators are using Listly. Here is a sample of a list.ly list of iPad and Web 2.0 tools created by Angela Naumann, a 4th grade teacher.
Pearltrees is more of a collection tool than a curation tool, since there is only a small bit of information the curator can add as the title of the pearl. But it is a slick, visual tool. You create your own pearls, do a search, find some others you like, and add them to your pearl on the topic. (It reminds me of Ancestry.com when you find a branch of your family tree created by someone else and you add it to your own tree.) The visual aspect allows you to easily move through your pearls.  Pearltrees is also available as an iOS and Android app.
Tagboard is a interesting curation tool. You can create your own hashtag, and, when that hashtag shows up in Twitter, Facebook, Vine, Google+, and Instagram, the posts are curated on your Tagboard page. In addition, you can use Tagboard to search hashtags. I searched for #discoveryeducation and came up with this page. You have to remember that hashtags are an imprecise tagging system, since anyone can use any hashtag they please in a social network post. There are often outliers when you do a hashtag search.

Do you use any other curation tools? Share with us on Twitter! #kathyschrock