kathy@kathyschrock.net

Tuesday, September 18, 2012

Wipad iPad Wireless Projector

I was sent the Wipad Pro (http://gowipad.com) to demo and it is a cool device! The receiver plugs into an HDMI port on a projector or monitor (or to a VGA connection via a VGA/HDMI converter box accessory offered by Wipad). The snap-on back for the iPad 2 or new iPad with its  attached transmitter plugs into an Apple HDMI dongle and the 30-pin port on the iPad. The transmitter recharges via an included USB cable.

Wipad Pro: snap-on back, transmitter, and receiver


The iPad is projected in HD and the sound winds up coming out of the TV or projector. You are not tethered to the projection device so you can roam around the room. So what makes this different than simply mirroring with the Apple TV? One big thing that is useful for many schools.

With an Apple TV, the iPad and the Apple TV need to be on the same network, whether the Apple TV is being used wired or wirelessly. The Wipad does not use the network to connect and does not impact the network traffic! It uses a wireless technology that does not interfere with any other devices. So, when you are streaming that Discovery Education video from the iPad to the projection device, you are not utilizing the network bandwidth. The IT crews will love this device! And, in addition, there is no lag at all, with video, audio, or apps. I even powered up SlingPlayer, which loads the cable connection at my home to my iPad, projected it via the Wipad, and it was perfect on the TV!  (In addition, the Internet connection on your iPad still works, something that does not occur if you have to set up some type of ad-hoc network between your iPad and a computer.)

For school use, IT departments will be happy and for those of you that cannot wirelessly project via an AppleTV at school, this is a good solution. For those of you who present in hotels or in rooms with no WiFi, this device can be used to present since you do not need a network. You can roam with up to 100 feet away as long as you have line of sight to the receiver.  If your school or organization purchases several Wipads, the receiver can store the identifier of up to eight transmitters. This is helpful if the receivers stay plugged into projectors or televisions in various rooms and the iPads move around.

Set-up of projection. Projected image is perfectly clear. The photo is not!


There are a couple of things I need to mention. The Wipad does work great. You simply pair the transmitter with the receiver and the projected iPad immediately shows up. You can wirelessly project from up to 100 feet away. The snap-on back did not fully snap-on to my new iPad since I had a skin on the back of my device. If your iPad does not have a skin, there should not be a problem. The transmitter that attaches to the back of the snap-on back does add a little weight (6 oz.) to the iPad, but nothing that would preclude carrying it around the classroom or presentation venue.

The price of the Wipad Pro is advertised at $399 on their site. Educators can receive a discount of 25%. There are volume price breaks for the purchase of 50 or more, but things can be negotiated on a case by case basis. You can read more about it, see the specs, and the features on the Wipad site.

Saturday, September 01, 2012

Your Virtual Blue Binder


As a student, when going back to school in September, there was no event I waited for more than shopping for school supplies. I would love the fact everything neatly fit into a blue binder, and my subject dividers and pockets kept my notes and handouts organized throughout the school year
Today’s students and educators have a different type of organizational task to think about—organizing their virtual resources. Keeping Web links available on whatever hardware device they are using. Storing photos.  Be able to access email from anywhere. And keeping up with blog posts and social networks. Oftentimes, items seemed to be spread among too many places.
What are some helpful tools to keep in your “virtual blue binder”? Here are just a few of the types of tools that can be helpful. There are many online tools that fit into these tool types. Please add your suggestions in the comments section and be sure to include the “type” in your reply.
Type: Aggregators
An aggregator is an online Web tool that aggregates or pulls a bunch of things together. Aggregators are also called newsreaders. The tool automatically gathers newly published articles of interest from news sources and blogs all over the Web to one single place for you. These Web sites allow you to “subscribe” to receive their new content by typing the URL of the site into the aggregator. The techie name for this process is Really Simple Syndication, abbreviated as RSS.
Some popular aggregators include:
  • Google Reader is part of the Google suite of tools and the most-used newsreader.
  • Feedly is available as an add-on for Chrome, Safari, and Firefox and also has apps for the iOS and Android platforms. If you have your Google Reader all set-up, you can use Feedly to easily access your subscribed feeds on a computer, tablet or smartphone.
  • Reeder is a newsreader app for iPhone, iPod Touch, iPad, and Mac computers.
Type: Capturing Tools
Capturing tools are like Swiss army knives. They allow you to photograph, record, scan, copy, paste, and gather items all in one easy place. These capturing tools are for your own use, although sometimes colleagues use the same account to share their discoveries or find other ways to share their findings. . These types of tools have various feature sets, including taking notes,  the ability to tag, search by keyword, turn handwriting into text, convert PDFs into editable text, and much more.
  • Evernote is the most popular tool in this category. Evernote has a Web-based site, a Web clipper extension for many of the popular Web browsers, and apps for iOS, Android, and third party apps for WebOS tablets. Your Evernote items remained synced no matter which hardware you use to access them. There are also specialty apps that allow you to connect your Evernote to online storage sites, handwrite notes and send them to Evernote, and other cool connections. And you can even email your text, images, and audio to your Evernote account. Once in the account, you can create folders, called notebooks, to keep your information organized and accessible.
Type: Curation Tools
Curation tools allow you to gather information, organize it in a meaningful way, annotate it and add your thoughts, and then share it with others. Curation tools differ from the capture tools since the idea is to meaningfully arrange items by whatever criteria you decide and make it available to others. This a very crowded arena right now, so I recommend you find the single tool that does what you want to do, and stick with it. Don’t jump around or cross-post to other tools. Spreading the URL of your curated information is encouraged, though!
  • Pinterest is a wildly popular curation tool. Starting out as a way to save images of items one was interested in, it has quickly grown to be a place where educators “pin” Web sites and items of interest on categorized “pinboards”. You can search across all the content on the site, “repin” something to one of your pinboards, or comment on a pin. Take a look at my search on “iPads in the classroom” to get a feel for the type of information you can find. And, when clicking on a pin, you can get to that educator’s entire pinboard, like this one called Technology in the Classroom.
  • Scoop.it is an easy-to-use tools to curate items of interest. Your first create a topic, then install the bookmarklet on your browser’s toolbar, and just add items to your topic pages easily. In addition, Scoop.it gives each topic page an RSS feed which allows you to easily aggregate the “scoops” of others in your aggregator.
  • Educlipper is a new curation site that is specifically dedicated to educators and students. You can create “clipboards”, add articles, images, audio, and more that you find to them, “reclip” items from others, and share your clipboards with the world!
  • BagTheWeb allows you to create “bags” of information sources for yourself or to share with others. They have a page dedicated to the use of their tool in the classroom that showcases some good ideas!
  • Paper.li allows you to create a tagged, organized daily newspaper from information you post or gather from Twitter, Facebook, Google+ or any web content.
  • Pearltrees allows you to use a bookmarklet in a browser or in Safari on the iPad to send “pearls” that you find to folders. It also allows you to automatically save resources you share on Twitter or Facebook to your Pearltree. You can share these folders, and see who else has curated the same resource, thus finding others who are interested in the same topics as you!
  • Weebly is an easy to use Web page creator that allows you to organize information, upload images, attach files, embed content, and create weblink lists. They even have a free education version that allows you to allot Weebly accounts to your student.
Type: Online File Storage
One of the organization tools that comes in very handy is the ability to have all of your files with you at all times, no matter what the format. There are a host of online file-hosting services available that are no cost and some let you share documents with others, too. Read the rules carefully. Some, like Dropbox, only allow x number of megabytes to be downloaded by others from your public folder per month. (I learned this the hard way with a note from Dropbox telling me I exceeded the limit and they were not allowing access to my public folders for three days.) Some have a limit of 100 megabytes on the files you upload.
  • Dropbox starts you off with 2GB of online storage space, but, through referring others, you can increase that to 18GB. There is a public folder to share files with others and you run a Dropbox application on Windows, Mac, Linux, and mobile platforms. There is even a plug-in to Dropbox called DROPitTOme which allows you to give a secure URL to others who can then upload files to your Dropbox.
  • Box is another popular file storage and file sharing site. For free, you get 5GB of stograge, can view your files on demand, can share a link to a file to a colleague, and even share an entire folder of files. A Box application is available for Windows, Android, and iOS.
  • SkyDrive is a Microsoft file storage site that starts you off with 7GB of file storage space. There is an SkyDrive application for Windows and Mac which allows you to move files up and down, and Windows Phone app, iOS app, and third party app for use with Android.
  • Edmodo is not meant to be an online file storage site. However, any asset you upload into this learning management-type system gets a public URL. Simply right-click on the uploaded asset (up to 100 MB), copy the long, cryptic URL and, using a URL shortener, create a short URL of the file to share with others.
Type: To-Do Lists
One of the nice things about online and app-based to-do lists is the ability to keep your tasks organized and prioritized at all times. There are lots and lots of to-do apps. I have tried many of them personally. Some are very complex and full-featured. Others are just basic and provide only a few features. Here are some suggestions.
  • Mac Reminders works with iCal, Outlook, and iCloud. and your iOS device.  (There is also a  new desktop app in Apple’s newest operating system, Mountain Lion.) Reminders allows me to set priorities and alarms, create separate topic lists, and allows me to set a location where I want to be reminded– for instance “Remind me when I get to work to write the article for Steve.” When I pull into my work parking lot, up pops the reminder on my phone. I really love location-aware apps!
  • Remember the Milk (RTM) is an online to-do list and task management application. There are mobile apps for iOS, Android, and Blackberry and you can view your tasks on our Apple iCal or Google calendar. You can even aggregate your task feeds with your aggregator and get reminders about your apps via instant messaging. And, if you are a big Twitter user, you can even use direct messaging on Twitter to send your tasks to RTM.
  • Nutshell is simply a browser-based to-do list with the ability to prioritize and make separate lists by topic. It is accessible through the tablet browsers, includes RSS in case, as the teacher, you want to assign tasks to be delivered to students’ aggregators, and is simple and easy-to-use.

Monday, August 27, 2012

Point 2 View to Evernote!

I have been using the IPEVO Point 2 View and the Ziggi USB document cameras for the past couple of years. Their ease of use for projecting 3-D objects, snapping images, and recording videos has made them a staple in many classrooms. The Point 2 View software for the desktop will soon be updated to include sending the captured images directly to Evernote!

I have long demoed Evernote to teachers and students. The ability to both upload and access the Evernote notes from all types of devices makes it the perfect curation tool for students. I, myself, have only just begun using Evernote to its full potential and on a regular basis.

When IPEVO sent me a beta version of their new software with the Evernote integration, I was very excited to try it. It works like a charm! Here are the images of the process of snapping an image and sending it to Evernote from the IPEVO desktop software.


Choosing the IPEVO image and the notebook in Evernote to send it to.

IPEVO to Evernote success!

The note and image as viewed in Evernote
With more and more classrooms having IPEVO doc cams and students using Evernote software, the integration of Evernote into the P2V software is sure to be a hit!

Sunday, August 19, 2012

More Gadget Reviews


I have a couple of other items I wanted to review for you...


Tego Case for iPad2 and the new iPad

The Tego case for iPad is another protective case for the device that schools should put on the consideration list. The iPad is easy to get in to the case and it has extra reinforced corners to avoid damage to the device. 

Tego site: http://www.yourtego.com


The Tego case is made of a very lightweight material but is thoughtfully designed to bothprotect the iPad and allow easy access to ports, buttons, and speakers. 

In addition, the material has an anti-bacterial property to keep the germs at bay. In schools, where the iPad gets used by multiple students, this is a great feature to have!

The retail price of the Tego case is $38.99.


Kingston Wi-Drive


This is a cool little accessory for your mobile devices. I purchased the 32GB version ($89.99) but it also comes in 16GB and 64GB. The Wi-Drive is about the same size and shape as the Apple iPod Touch but it weighs a lot less in your gadget bag!


The Wi-Drive attaches to your computer via a USB cable so you can first move files, movies, photos, and music to it. (It also charges via the computer USB port or with the included AC adapter.)


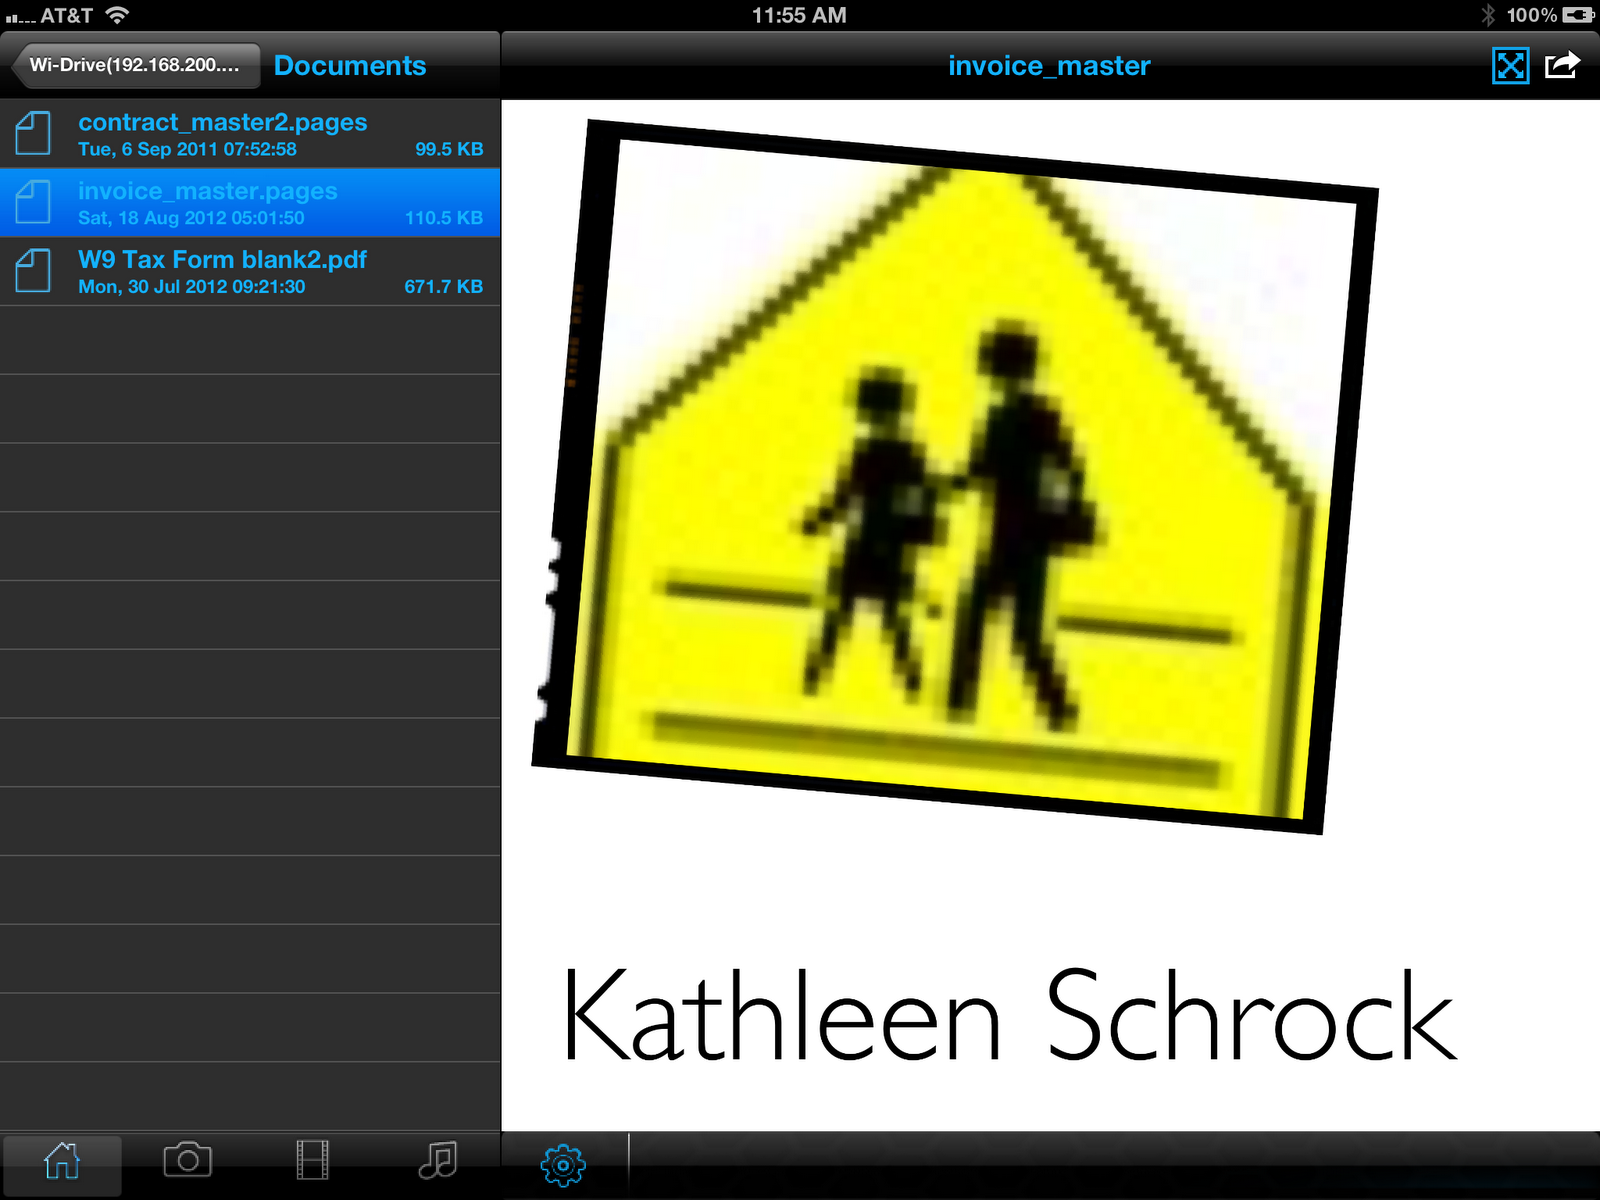
You have to dis-attach the Wi-Drive from the computer to use it. Once you turn it on, the Wi-Drive creates an ad-hoc network with the SSID of Wi-Drive. You must then install the Wi-Drive app for iOS or Android onto your mobile devices.

Wi-Drive network on iPad
On your  mobile devices, simply visit the network settings and join the Wi-Drive network. Up to three devices can view or play the files on the Wi-Drive at one time. They can all access different files and even start the videos at different times. (Imagine loading it up with 32GB of movies for a long trip!)


DRM movie playing in iPad browser


For moving DRM movies from iTunes, if you sync your iPad with your computer's iTunes account, you simply drag the movie to the Wi-Drive, and access the movies through the Web browser on the mobile device via the static IP of the Wi-Drive. Purchased items may only be played via the Wi-Drive on mobile devices that have the same Apple ID as the computer's iTunes account.


File system and file on the Wi-Drive
The Wi-Drive acts as external storage and is accessible even when you do not have WiFi available. And, for non-DRM items, any three mobile devices can connect to the Wi-Drive and view or play the files. The Wi-Drive is an interesting concept, and I will be spending more time thinking of creative ways to use it!


Side note: We have an MicroCell (cell phone service booster) in our house so, on the iPhones, we had to put them in airplane mode and then turn just the WiFi back on in order for them to see the Wi-Drive. No problem with the iPad, since it does not use the MicroCell.


Have any gadgets you would like to share? Just post about them in the comments!

Sunday, August 12, 2012

Cool stuff from Higher Ground

Those of you that follow this blog know that I have been a long-time fan of the Higher Ground products. Two new ones that have caught my eye lately are the PROTEx iPad protective case and the Profile computer/iPad case.


PROTEx

I saw the PROTEx iPad case demonstrated at ISTE12 with a Higher Ground rep throwing his iPad, safely encased in the PROTEx, to the carpet and watching it bounce! He did it over and over and everything was fine with the iPad. I have not tried it with mine, but the shock absorption capability certainly lives up to my expectations! (It fits both the iPad 2 and the new iPad.)

My favorite components of the PROTEx, in addition to knowing my iPad will be safe from harm if I drop it, are the iPad speaker redirect channels and the elastic strap on the back that allows you to securely hold the iPad when standing, presenting, or moving about a classroom.  

Speaker channel on Protex

The iPad speaker channel, built into the PROTEx, redirects the sound from the speakers which are on the back of the iPad to come clearly (and loudly) out the front of the iPad! 

This photo shows the design of the channel when the iPad is not in the PROTEx. You can see the front openings for the speaker sound at the bottom of the photo.


Elastic strap on Protex


The elastic strap on the rear of the PROTEx allows you to easily hold the iPad in either landscape or portrait mode. The elastic is stretchy and secure, and it comfortable on your hand.

The PROTEx itself is just a little thicker than the iPad and weighs very little. It fits very securely on the iPad, too. I would recommend the PROTEx for anyone that carries an iPad around, works in windy situations (like the Weather Channel meteorologists and storm chaers!), and students who could feel confident that their iPad would be protected if dropped since the PROTEx protects!


Profile

MacBook Air and iPad in Profile

I am always in search of the perfect case for my iPad and 11.6" MacBook Air. These are the two devices I carry around most. The best part about the Profile is that both the 11.6" MacBook Air AND the iPad fit nicely in the case!

The laptop pocket zips up and has both memory foam protection and a plushy soft interior.

If you were not carrying a tablet, the front pocket could easily hold a spiral notebook or book.


The Profile is a vertical case, another feature that I look for in a case. The front flap is magnetic, which makes it super easy to open and close. 

The inside has two pen holders, a phone pocket, four business card/credit card slots, and a clear ID pocket.  There is a small zippered compartment for your power supplies or smaller items.  The back of the Profile has a slip pocket for papers or a manila folder. 

The Profile is solid and keeps it shape nicely due to the padding and construction. I know my devices are protected in this case.

If you have any questions, feel free to ask!


Thursday, August 09, 2012

Retiring the Guide for Educators

August 7, 2012

To all my educator colleagues:

As you all know, I retired in June of 2011 from my school district job as Director of Technology. I retired to spend more time learning new things to support you as you embed technology into teaching and learning in a meaningful way. I now have the time to visit districts and help with their technology-related initiatives, teach online graduate courses for the Wilkes/Discovery Masters program and the instructional technology certificate program at Arcadia University, and host several Webinar series. Also, with this retirement, I have had the time to develop and enhance some online information sources for you.


1995 site
Since the time I started Kathy Schrock's Guide for Educators in June of 1995, a lot has changed. Web 2.0, social networking, and social bookmarking have allowed every educator to share their favorite sites with others. The search engines have become much more sophisticated and easier to use. And educators have become much more savvy with both finding and creating materials to use in the classroom. So, it is with mixed emotions that I inform you Kathy Schrock's Guide for Educators is also going to be retired.                                    
However, I am not retiring from providing you with great resources and ideas to support teaching and learning! I will still be an active participant in the Discovery Education community with my new blog, Kathy Schrock's Katch of the Month. The URL is http://denblogs.com/schrock and make sure to bookmark, Tweet, Like, Google+, and Pin it!  The first post will deal with organizational tools, apps, and resources to help you manage your virtual life. Please visit  "Kathy's Schrock's Katch" often, add me to your RSS aggregator, and contribute to the conversation on the blog!


Guide to Everything

I have moved all the support information for my conference and workshop presentations over to Kathy Schrock's Guide to Everything, located here, http://schrockguide.net, to help you as you think about the practical and pedagogical uses of technology. The evaluation pages, bulletin board pages, and readability pages have been ported over from Kathy Schrock's Guide for Educators, so you will still have access to some of my most popular information. In addition, Kathy Schrock's Guide to Everything includes tons of resources on current educational topics such as authentic learning, Bloom's Digital Taxonomy, iPads, Twitter, infographics, and many more.

I will continue to maintain this personal blog, Kathy Schrock's Kaffeeklatsch, where I post gadget reviews and information as well as my other thoughts. You can also follow me on Twitter at @kathyschrock where I share all kinds of quick tips and ideas.


I want to thank all of you for your use of Kathy Schrock's Guide for Educators over the years and all the kind notes you shared with me when you found that perfect resource. I realize it is the place where many of you first started your online journey, back in the days of the "information superhighway", and I know you will remember it fondly!

I hope to hear from you via the new sites I am now creating. Feel free to continue to email me at kathy@kathyschrock.net whenever you need help!

Wednesday, June 13, 2012

Cool DIY project (or not)!

VGA to 30-pin and USB connection 1

 One of my problems, when considering presenting from the iPad is the ability to keep it charged and hook it up at the same time to the VGA connection present on most data projectors. Both the sync/charge cable and the VGA dongle for the iPad need to use the same 30-pin connector port on the base of the iPad.

Apple HDMI Dongle
Apple offers the HDMI dongle for the iPad that includes a pass-through for the sync/charge cable. I guess this is for watching multiple movies while the iPad is attached to your television via the HDMI port and being able to keep the device charged for the movies.

I know you can mirror your iPad using an Apple TV attached to your television, and you will soon be able to mirror your desktop the same way.

But, in most classrooms and presentation arenas, the data projector does not have an HDMI port, but has a VGA port. I started looking for a VGA dongle for the iPad that provided both VGA out and also allowed the iPad to be powered at the same time.

After extensive searching, I almost gave up, until I came across these DIY (do-it-yourself) project instructions. However, instead of attempting this myself, I decided to purchase one from the creator of the instruction set. He had already modified several and the reviews were outstanding.Well, I received it today and it works perfectly! I was able to project via VGA and keep the iPad charging!

The idea is simple-- the creator opens up the VGA dongle and solders a USB cable in, so you can charge the iPad via the USB cable and the power brick, as well as attach to a projector via the VGA port on the dongle. The iPad will project and stay charged.

Here are two photos of the completed project from two different angles.


VGA to 30-pin and USB connection2
If you are interested in finding out more, please send me an email and I will give you the contact information for the creator.

Saturday, June 02, 2012

Mirroring the iPad with your own network

So, as I have been on the road a lot this past year, airports, hotels, and coffee shops have become some of my favorite places to get work done. Recently, I have been working on iPad workshops and wanted to record the iPad screen by using the Reflection app for Mac. 

When the iPad and laptop are on the same wireless network, and you launch Reflection on the laptop, the laptop becomes an AirPlay device for the iPad. On the iPad, you double tap the home button, swipe right, chose the AirPlay icon, pick your laptop from the list, and choose to mirror the iPad screen.

The iPad shows up on the computer screen as in the image below, and, through the app, you can record everything you do on the iPad and save it as a movie file for demo and/or training.

iPad mirrored to the desktop using Reflection

However, when trying to do this same thing in a hotel, an airport, or a coffee shop, I could not get the AirPlay icon to show up on the iPad. I could not get the two devices to see one another. Well, of COURSE I couldn't! Why would you want any other device on a public WiFi network to see your laptop or iPad? The networks are designed to keep your stuff secure (even from yourself!)

Since I have a few iPad workshops coming up, I wanted to make sure, if the network I was going to be using prohibited me from seeing another device, I had a solution that would work. I actually wound up with two solutions!

FIRST SOLUTION


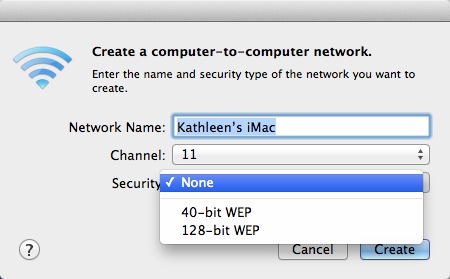
The first was to create an ad-hoc or computer-to-computer network between the Mac desktop/laptop and the iPad. It is easy! 
  • Simply go up to the WiFi symbol on the taskbar on the desktop or laptop.
  • Pick "Create Network" and you get the "Create a computer-to-computer" network box. 
  • Give it a name, pick either channel 1, 2, or 11, and secure it with a password if you want to. 
  • On the iPad, go to Settings:Wi-Fi and pick the ad-hoc network from the list to connect to it.


AirPlay choices on the iPad


Start up the Reflection app on the desktop/laptop, double tap the home button on the iPad, swipe right, chose the AirPlay icon, pick your desktop/laptop from the list, and choose to mirror the iPad screen and you are in business!


 You will not be able to use the Internet on the computer when the computer-to-computer network is on, so, when you are done, don't forget to go to the WiFi icon on the desktop and choose to "Disconnect from . This will close your computer-to-computer network.


Since the Reflection app is only available for the Mac, there is another alternative for Windows and Mac called AirServer. The documentation states it will work over an ad-hoc network, too, so follow the directions for creating the Mac ad-hoc network above and find out how to create one in Windows 7 here.


SECOND SOLUTION


While searching for an answer to my question, I also came across a reference on how to create an ad-hoc network using the new CloudFTP device, which also does many other things, too.


I remembered that I already owned a Zuni Connect Wireless Travel Router and USB Charger which was intended to create a secure personal network in a WiFi or wired environment. I figured if the CloudFTP device could create an ad-hoc network between two devices, perhaps the Zuni Connect could, too. I simply powered it up, attached the desktop/laptop to the ZuniConnect network, and used that personal network it created to create the ad-hoc network with my laptop/desktop. I was able to connect the iPad via AirPlay on that private network and mirror it to the desktop/laptop. (I am going test this in another environment than my home to make sure it really does work!)


So, I have two solutions to utilize if the network I am using will not let my two devices see each other over a computer-to-computer network! Have you come up with some additional solutions?

Friday, June 01, 2012

iPad Apps Review 1: FreeSpeech & Draw on Slides

I decided to combine two short iPad app reviews in one blog post.

FreeSpeech

The first review is the release of my son's no-cost (and no ads!) AAC app, FreeSpeech, which was created to support those with communication disorders. The goal was to provide an app that would be easy to use, scalable, and encompass new features. The team has been developing the app for over a year and formed a non-profit, GiveSpeech, to help keep the app free. They are working hard on enhancements all of the time!

The app includes a series of symbol libraries upon download, and the ability for the user to add their own icons. However, the coolest features are the community and collaboration aspects. Users can upload and share icons they create or photograph and also download those from others from within the application iteself. This allows for an never-ending shared library of all kinds of new icons! I just visited the community area and downloaded a set of photos called "Trip to the Farm" uploaded by another user. I can see the community growing and perhaps including a discussion board to include requests for images needed and users volunteering to create those icons for others.

I used the Reflection app to create a short video to showcase FreeSpeech. This is only a brief overview of how it works. (The voice sounds a lot clearer in real life than it does in the video, promise!)


Download FreeSpeech for yourself and try it out!  There are also instructional videos located here, but FreeSpeech is so easy you probably won't need them!

Take some photos in your area of things that others might not have in their region or town and take the time to upload them to the FreeSpeech community area. I am going to add some regional Cape Cod items like lighthouses, windmills, and cranberry bog to the community soon.

Draw on Slides

In the video above, I took a screenshot of the last screen of FreeSpeech and added an image to my photo library. I then used an app called Draw on Slides to mark it up. You can see that there are different colors and thicknesses of lines to chose from as well as the ability to place an arrow on the line if you wish. This marked up image can be saved as a new image to the Photo Library, sent to Facebook, or emailed. Draw on Slides is a useful app to mark something up in front of students or share an instructional image with others.

Sunday, May 20, 2012

The interlocking of cognitive processes

Yesterday on Twitter, Dr. James Norwood (@JRNorwood) posted a short tweet entitled "Flipping Bloom's Taxonomy". The intriguing title led me to click to the link that led to his Teaching in the Middle blog post about a blog post he had read on Shelley Wright's blog, Powerful Learning Practice.

The gist of the blog post was Shelley's idea to start with the creating cognitive process and "flip" the pyramid so it looks something like the image below.. She states, "Here’s what I propose. In the 21st century, we flip Bloom’s taxonomy. Rather than starting with knowledge, we start with creating, and eventually discern the knowledge that we need from it."

http://plpnetwork.com/wp-content/uploads/2012/05/bloom_pyramid-2.png

 I do not think I agree. I do promote the use of problem, project, inquiry, and/or challenge based learning models  to allow students to take control of their learning. However,  I truly believe students need to have at least some knowledge-base in a topic before they can analyze, evaluate, or create something with the content at hand. In addition, during the acquisition and creation of new knowledge, learners move up and down the cognitive levels as they need to.

Shelley states that she (and many others) were taught that "Blooms becomes a “step pyramid” that one must arduously try to climb with your learners." I am glad my professors at Rutgers College of Education did not teach it this way! I am a big fan of the pedagogical model and thinking about the different levels has always allowed me to plan activities at any (or all) of the levels at any point in the teaching and learning process. I never thought of Bloom's Taxonomy as a series of steps to the top.


However, I do agree with Shelly that the pyramid shape, with the little tip left for creating, may confuse some educators into thinking only some students are capable of getting to that level or creativity is a small component of the cognitive skills process.


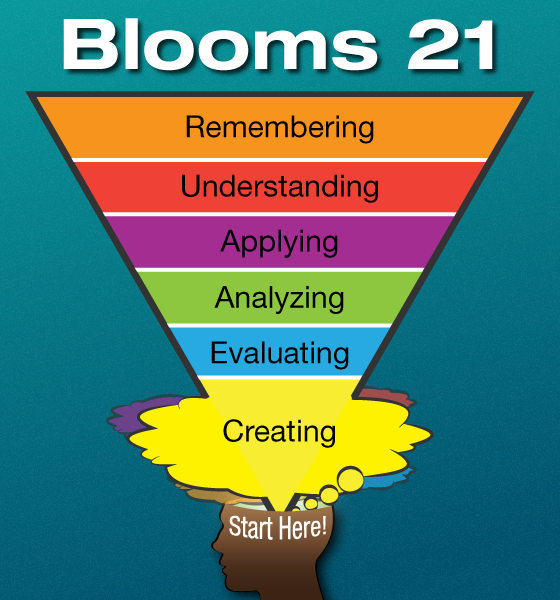
I gave it some thought, and developed a different graphic to represent the taxonomy based on how I utilize it. Take a look at the image below and let me know what you think!


References:
Norwood,  James. 17 May 2012.  "Flipping Bloom's Taxonomy". Blog post. Teaching in the Middle,
Wright, Shelley.  15 May 2012. "Flipping Bloom's Taxonomy". Blog post. Powerful Learning Practice.

Friday, April 27, 2012

I love my Twitter PLN!

Today I created a video with the very fun app for the iPad (and iPhone and iPod Touch) called SockPuppets. I had a special reason for using it and purchased extra time to make my video longer than the 30 seconds that they allow.

The output options in SockPuppets are to share to Facebook or YouTube. I needed to get the video up to YouTube, so I thought I was all set. However, I got an error message whenever I tried to send the video to YouTube. I figured I could solve it with a little research.
  • I did some searching, and could not come up with any posts of others having troubles. 
  • I then went to the app creator's Web site and looked in the Knowledge Base and FAQ's.Nothing there.
  • I did a chat session with tech support at the company's site, and was told I probably needed to set a setting in YouTube that would allow uploads from third party apps.
  • I looked through YouTube and found no such setting.
  • I then put in a request to the YouTube team for help.
  • I posted my first note to Twitter asking someone to try to do the same thing so I could see if it was just me. Of course, I am retired, and everyone else was actually teaching, so I did not get any responses.
  • I tried it on the iPhone with the same resulting error message.
  • I decided to share the video it to Facebook, which worked well, and then used the new version 2.1 of Camtasia for the Mac to record the video from Facebook. I then moved the resulting screencast to YouTube.
  • I posted another tweet asking for help and got lots of responses. Some of my PLN members even took the time to download the app, create a video, and try the upload. Below are the responses I received. The results were mixed, and I could still not figure out the problem.
Twitter answers to my ask for help


Jen Legatt (@192TIS) was a new user of SockPuppets, so, when she told me it worked for her, I asked if she used a Gmail address when the app asked for log in information to YouTube. You can see from the above conversation that she told me she had used only her USERNAME, not the full Gmail address. Doh!

I went back and looked at the sign-in screen in SockPuppets and it did just say enter your YouTube username and password, not your Gmail address and password. Geesh! Once I put in only my username for YouTube, not the entire Gmail address, it worked like a charm!


I spent most of the day figuring out how to make this work and searching and asking. And it was one little follow-up question to one of the great educators that were helping me out that provided the answer! I love my Twitter PLN!


Wednesday, April 25, 2012

More cool stuff from BoxWave!

Derek Gillette, a Marketing Coordinator at BoxWave, sent along two new tech items for my review. Thanks, Derek!


BoxWave Nero Leather Smart Nuovo iPad Case

The first is the Nero Leather Smart Nuovo iPad Case, created for the 3rd generation iPad. (I see there is also a red version, which I am craving, and a cool white one to match those of you that have the white iPad!) This leather case is available for $39.99, with free shipping, on their site right now. The regular price is $59.95.


This case was definitely created for the newest iPad. I have a couple of other tight-fitting, snap-on cases that were made for the iPad 2, and the new iPad does not snap in perfectly to those cases since it is a tad thicker.  The new iPad snaps firmly into  the Smart Nuovo case's back. I also have a skin on the back of my iPad and it still fit in tightly and firmly.


Inside of BoxWave's Smart Nuovo iPad Case


Smart Nuovo iPad Case with closure and cutouts
The case has all the cutouts needed for the sync cable, headphone jack, microphone, camera, access to the top and side buttons, and has a nice grill across the speaker area which keeps that area safe from scratches.

The Smart Nuovo case is called "smart" since the cover is a smart cover that turns the iPad's display off when it is closed and turns the display on when you open it. I use one of Apple's Smart Covers, but, with this case, there is no need to! This case truly protects the front and back of the iPad while adding very little size and "heftiness" to the iPad.


Smart Nuovo iPad Case in "stand" mode

The Smart Nuovo iPad Case closes with a leather flap, and the same leather flap is used when you fold back the cover and use the case as a stand. (I am not a big stand user, since I hate getting the inside lining that protects the screen dirty by propping it on a table.) However, for those of you that are not worried about that, the stand puts the iPad at the correct angle for viewing and typing on an external keyboard.


BoxWave Universal EverTouch Capacitive Stylus

Woven fiber tip
The second item Derek sent along was the Universal EverTouch Capacitive Stylus. As one who owns various styli, I was interested to see that the stylus tip of the EverTouch stylus was made of a woven fiber rather than the other types of rubber or felt-like tips on the styli I already owned. The cost online right now is $12.95, with volume purchasing available. The regular cost is $24.95. It comes in orange, blue, black, red, and silver.  The Evertouch Stylus body is aluminum and very light. 


 It also comes with three different types of lanyards. There is a lanyard to attach it to your keychain or neck lanyard, there is  a lanyard that allows you to plug it into the headphone jack on your device so you always know where it is, and the unique lanyard was one with the same headphone jack but it had a coil that allowed you to use it while it was plugged into the headphone jack. 

The third lanyard was the most handy and gives you the least chance of losing the lanyard. It worked best while holding the iPad in landscape mode.

Addendum: I got so caught up in the cool tip and lanyard I forgot to mention the stylus' performance! It worked easily and without fail for selecting, drawing, typing, and writing.


If you or your school is interested in educational/volume licensing, drop Derek Gillette a line!